
Although the handheld/portable test sets are not meant to be used in permanent test automation applications, they do support SCPI commands originally intended for internal automated regression testing, software verification, and their own final production tests. However, we often get request from some of our customers asking for help about using the same commands to create their own scripts, to automate specific tests. The SCPI Remote & Command Reference PC Tool is offered as a dynamic reference to help users developing scripts identify commands, syntax, arguments and sequences.
The optional (paid) Windows® PC software license provides a low-bandwidth session-based parameter-oriented multi-session and multi-test configuration user interface (UI) via SCPI commands. Its main goal is to be used as a reference tool to identify specific SCPI commands to be used in writing automated tests programs (scripts) requiring detailed configurations and iterations. It is provided in lieu of lengthy and complex command reference books, to allow users to configure, run tests directly on the test set and then copy the required commands for further customization and integration into their own scripting environments. Nevertheless, it still qualifies as a simple multi-user multi-test remote control function, capable of simultaneously running up to four independent test sessions in a Dual TX340s or RXT-6402 test set (2 in the TX300S, RXT-3400, RXT-6200; one in TX320S and older products).
30-day full-feature trial period is included upon installation.
Script programmers can test drive and verify the required test configurations to make sure they are correct and then extract (copy) all the SCPI command lines required to embed the necessary commands in their configuration script, with the correct syntax, arguments, hierarchy, dependencies and order, eliminating the need for lengthy and complex written CLI reference manuals. The reduction in syntax errors and the automatic selection of the right commands for the application can help in substantially reducing the script programming time. (Scripting language or command sequencer are not included with this tool.)
It basically replaces what would be an extremely long manual listing thousands of individual commands and all their arguments, but instead of searching for all possible commands that may be needed for a specific test application configuration (and perhaps missing some that may not seem obvious, relevant or be out of sequence), user would use this tool to run and verify the configuration and capture all the commands and responses required for the task. From there users can customize their own commands for the scrip and built them into automated processes.
This PC tool works with most current VeEX multi-service transport products (e.g., TX340s, RXT-3400, RXT-6200, MTTplus-340, MTX150, etc.). The PC application should be run in administrator mode.
1. Requirements
- MS Windows® PC running Windows 7 or newer (compatibility with XP is not guaranteed).
- Full HD screen with 1080 lines or better. (Refer to this support article if the window doesn't display correctly in high DPI monitors.)
2. Functionality
The SCPI Remote & Command Reference PC software provides two major functions:
- Multi-session Remote Control (depending on target product) – Each user can run multiple instances of the SCPI Tool for each individual tests concurrently, up to the number of test port groups available in the test set. All tests are independent. The final intention is to verify test configurations, command sequences and procedures and identify the commands required to automate the process via scripting.
- SCPI Command Reference – Instead of having to go through manuals looking for which individual commands may apply to certain test scenarios, their arguments, dependencies or sequence, this software allows users to set the instrument the way they intend to be used, using a simplified user interface, verify the configuration is correct and run the test while logging all the SCPI commands required. SCPI command batches can then be copied and pasted into a scripting tool of their choice, avoiding typos, dependency problems, sequence issues, argument errors or missing commands. It is provided in lieu of a manual to expedite the scripting process.
3. Using the SCPI Remote & Command Reference Tool
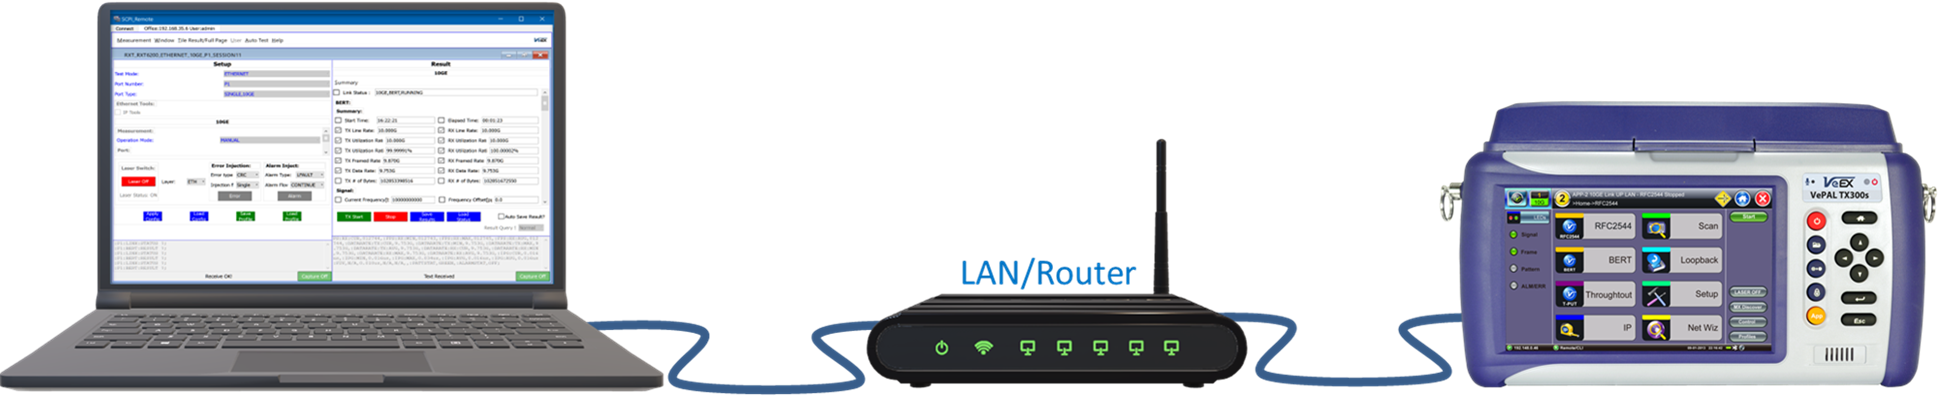
 The SCPI tool (also known as SCPI Remote) uses session-based approach that follows the same though process that goes into using the test set’s GUI or manually controlling it via Telnet session. Make sure the test set management ports (LAN or WLAN) have a reachable IP address.
- Launch the SCPI Remote & Command Reference PC tool application (first time, enter the license key or select the 30-day trial)
- Establish an IP connection to the test set via LAN or Wi-Fi. Users can store a list of all their test sets for faster connection. Select the desired target unit and press Connect.
- Create a session, which is similar to selecting one of the two or four test cards on the local/equipment GUI. Users can also re-join an existing test session.
- Assign test resources to the session (a full dual module or just one of its port groups)
- Select the Technology and Test Mode required for the particular testing needs.
- Start to operate the selected resource (Remote operation)
Depending on the target test set, each controlling user/script may be able to run multiple test applications and these concurrent tests can be run independently from the same or individual workstations. Note that each separate workstation (PC) would require a license. Users can also run multiple instances of the SCPI Tool in one PC, to control multiple test sessions on one or multiple test sets.
Connect the test set to the LAN or Wi-Fi, with routable or public IP address, so it becomes accessible to the controlling workstations.
3.1 Establishing a Connection
Launch the SCPI-based Remote & Reference software (in administrator mode), add a new IP Address and Location, or select existing one. Press Connect. Users can share IP lists by using the Export and Import functions.
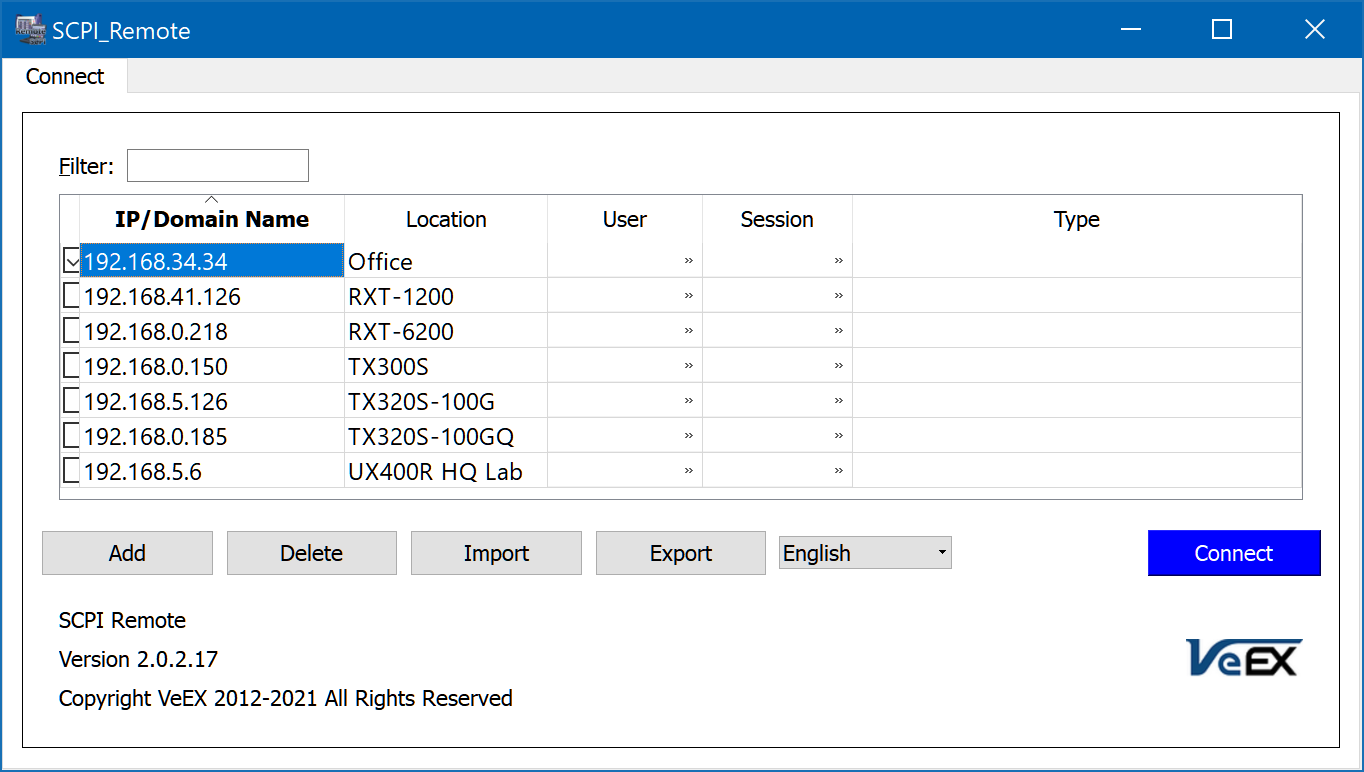
Enter the Login User ID (default is admin), Password (default is admin) and press OK to connect. It is strongly recommended to modify these factory default credentials. Changing those defaults and adding new users can be done within the application.

3.2 Establishing a Test Session
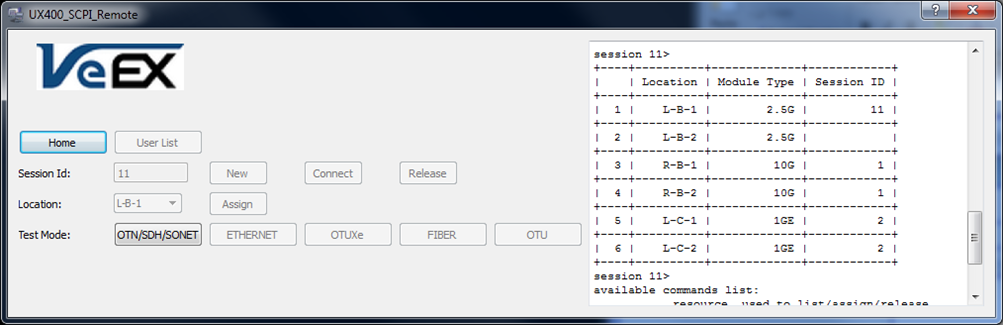
The Session Management window opens. Here users can join an existing test session, release existing sessions or create new ones. Leaving or joining a session does not affect any ongoing tests, so users can come back to it later on.
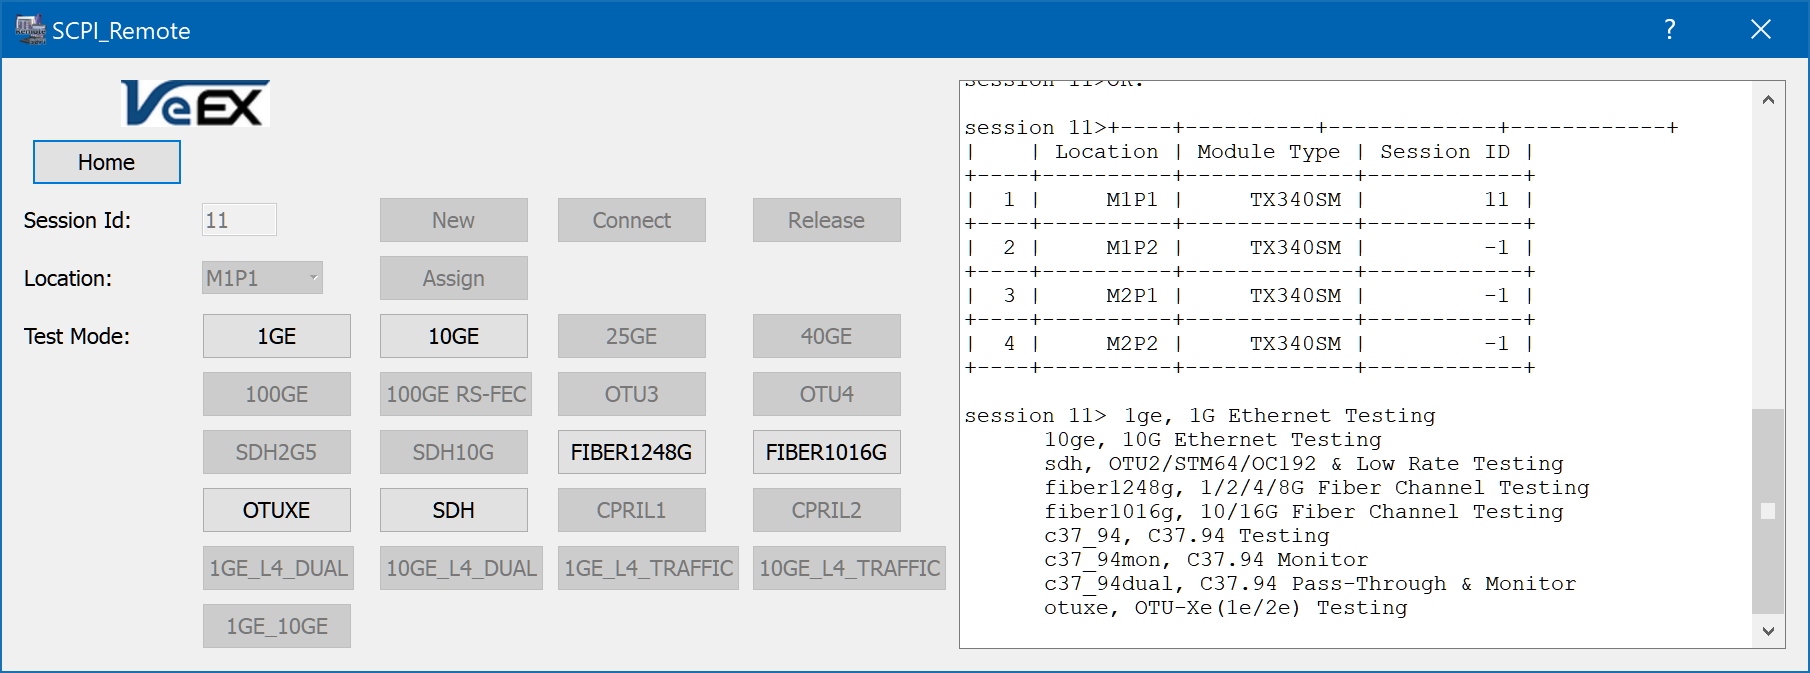
The terminal-style text-based status report, on the right side of the window, shows a summary of the resources available (empty Session ID or -1) and those already assigned to a Session ID (busy). It also shows who is using the resources. Local Users (session number 1 to 10) are those who have reserved resources directly from the test set’s touch screen or by using VNC or the browser-based Web Remote.
To join an existing session, enter the desired Session ID number and press Connect.
To create a new session, press the New button (twice) and the test set will assign the next available session number (11 to 99 for remote users).
Select the desired Test Module and/or Port Group from the Location pull-down menu.
The resource location are shown in X-Y-Z, P1 or M1P1 formats, depending on the product- X-Y-Z refers to the physical position of the module in the connector panel. For example, L-A-1 refers to the first port of the module located on the top left slot:
- X = Slot Column R/L (right or left)
- Y = Slot Row A/B/C
- Z = Port Group Number (1 or 2).
- In the TX300S and RXT-1200 platforms the resource location are shown as P1 and P2 to identify available Port Groups or M1P1, M1P2 to identify the built-in Module and Port numbers.
Only the available/applicable test resources are shown, based on actual modules installed. Press Assign to allocate the desired test resource to the current session. The text-based resource availability and session tables get updated to reflect the resource (or module) that have been assigned to the session.
The Session Management window will then display all the different Test Modes available for the particular test resource (module and port group) selected. Click on the button corresponding to the technology or test mode you want to run. Note that some test modes and functions may be optional and require a license purchase for the test set (no additional licenses are required for the PC SCPI Tool as it will work with the licenses already available in the test platform).
The SCPI-based Remote User Interface (UI) will start. The test set may take several seconds to complete the application launch process.
All remote tests will run in the background, so the test set screen may not be automatically updated during the process. The R icon at the bottom of the screen (next to the test set’s IP address) will turn green to notify local users that remote tests or scripts are being ran on the unit.
3.3 Re-joining an Existing Test Session
Users or controlling scripts may get disconnected from a long-term test (on purpose, accidentally, due to network issues, or because the user may be controlling multiple ports or test sets in sequence) and need to re-join an on-going test session. Using the SCPI Tool UI, users can go back to an active test by following this procedure:
- Enter the session number (e.g., 11) and click on the Connect button to join the existing session.
- If not automatically selected, please select the module originally assigned to that session (check the table) and Assign it again.
- Select the test mode originally assigned to the module or port (Warning: Selecting a different test mode would trigger a configuration change and invalidate any previous test and results).
- On the Setup side, click on the Load Config to retrieve the current test setup from the module and adjust the UI to match.
- On the Results side, click on the Load Status button to retrieve the current results, synchronize the UI and keep on updating the results.
4. SCPI-Based User Interface and Command Reference
The UI is simple to use as it provides a list of all possible configurable parameters with pull-down or data entry fields. It is divided into four resizable quadrants (a high resolution 1080-line, or better, screen is recommended).
A. Top-left: Has all the configurable parameters that apply to the interface and test mode selected, as well as the Error and Alarm Generation. TX and RX port settings can be programmed independently or coupled by using the TX=RX or RX=TX. Once all parameters are configured as desired. Click on Apply Config to send aal SCPI commands, required by the configuration, to the test set. Error injection and Alarm generation functions are also available.
B. Top-right: This contains the result fields (extracted from the received results messages) and the Start test button. Click on Start to begin the test.
C. Bottom-left: Logs all the SCPI commands being sent to the test set. Click on the Capture ON/OFF button to turn the log function ON to record all the commands into a text file. Commands can also be highlighted with a mouse and copied directly from the window. This field can also be used to learn or confirm the proper use of any commands. Script programmers may use these command and argument records not only to identify the proper commands, syntax, arguments, hierarchy and sequence, but to identify required or optional commands that may have not been obvious or thought of. The commands can be copied directly from this window or from the log file generated. Programmers can then embed the SCPI commands in their scripting language of choice and replace arguments with variables in their scripts. Here are some examples of captured commands::SONET FALSE; :MEAS:CLK INT; :TX:LINE OTN; :TX:OTN:RATE OTU2; :TX:OTN:MAP SYNC;
:TX:OTN:SCRAMB TRUE; :TX:OTN:FEC TRUE; :TX:OTN:CLK:SRC INT; :TX:SDH:AU:TYPE AU4;
:TX:SDH:VC:TYPE VC4_64C; :TX:SDH:BULK TRUE; :TX:PRBS:PATT PRBS31; :TX:PRBS:INVERT TRUE;
:COPY: TX; :TX:LASER 1;
:RX:RESULT:ADD "OTN:FREQ"; :RX:RESULT:ADD "LOS:CNT"; :RX:RESULT:ADD "OTU:LOF:CNT";
:RX:RESULT:ADD "OTU:OOF:CNT"; :RX:RESULT:ADD "OTU:LOM:CNT"; :RX:RESULT:ADD "OTU:OOM:CNT";
:RX:RESULT:ADD "OTU:AIS:CNT"; :RX:RESULT:ADD "OTU:IAE:CNT"; :RX:RESULT:ADD "OTU:BDI:CNT";
:RX:RESULT:ADD "OTU:TIM:CNT"; :RX:RESULT:ADD "OTU:COR:FEC:CNT";
:RX:RESULT:ADD "OTU:UNCOR:FEC:CNT"; :RX:RESULT:ADD "LSS:CNT"; :RX:RESULT:ADD "BIT:CNT";
:START;
Although some test sets may be able to accept command blocks (multiple commands sent in one line, with each command properly delimited by : and ;) this practice is not recommended. Sending one command per line is preferred, to maintain the best compatibility and/or script portability across different instruments.
Note: Although they could be very efficient when sending pre-set configurations, command blocks may be a bit more difficult to debug within scripts. However, we always keep on improving the ability to parse large command blocks in certain test sets. Keep the test set up to date and try it out, if interested.
If you decide to send commands in blocks, we recommend adding a space between commands, as a visual help for maintenance and debugging purposes.
D. Bottom-right: This is the results field. It logs all the responses sent by the test set, including acknowledgements (OK), values, status, error messages and results. This can be used to learn or confirm the different results formats and how they are interpreted. Results can also be logged into a file and copy-paste is also available. Use the Capture ON/OFF button to record the responses to a text file. Users can also select-copy-and-paste from this window, when capture is ON.

Use the >Measurement >Create/Delete feature from the top menu to open the Session Management window.
If the application's window is not displayed correctly (e.g., when using high-resolution screens), it is recommended trying the article in the following link, to edit the program's Compatibility Mode settings.
Not all test functions or test modes are supported by the SCPI Remote & Command Reference PC Tool. It focuses on providing references for the basic commands that users can apply to build more complex test applications. For example, instead of offering a complete RFC2544 test feature, it provides all the primitive commands that would be required to build a customized RFC2544 script.
5. Application-Specific SCPI Command Sample References
To download a copy of the VeEX SCPI Remote & Command Reference Tool install package for Windows PC (30-day trial included) and SCPI Commands Getting Started Guides for applications such as Ethernet, OTN/SDH/SONET/PDH/DSn, etc., scan (or click on) the QR code below. In the event that the downloaded ZIP file is flagged as an "Uncommon Download" or "can't be downloaded securely", click on the warning message, open the options, and select Keep and Keep Anyway. However, we take security very seriously, so we recommend not to download these files from sources different than the veexinc.com domain and to follow your organization's IT security policies. Please Contact Us if you encounter any issues.
 www.veexinc.com/SecureFile/VeEX_SCPI-Remote_Package.zip
The SCPI Commands Sample Guides are offered as visual references with examples of some common/typical commands structures, syntax, but not meant to provide a complete list of all available commands. For the actual command reference, VeEX offers the self-guided SCPI Remote & Command Reference Tool as the main documentation for script developers.
For certain test applications (including some that are not supported by the SCPI Remote & Command Reference Tool), users can initiate a telnet session, allocate the target test resource, launch the test application and enter the following SCPI command :DEBUG:INFO?; to get a raw list of all current commands, results, argument types, ranges etc., for further reference.