
1. V-TEST Internet Access Speed Test
The V-TEST™ feature qualifies network TCP/HTTP protocol performance by testing against a V-TEST HTTP server. It tests Internet speeds up to full line rate, using Ookla's Speedtest.net, Netflix's Fast.com or Ubiquiti's WiFiman.com servers to verify the maximum download and upload data rates attainable by subscribers' high-speed or Multi-Gigabit Internet access services. In certain products, this test application is launched automatically after turning the test set ON, in others it needs to be launched manually. The user interface and options may vary slightly from product to product and by software versions. (The examples shown in this guide are from small handheld test sets, like FX120 and MTX150x, however similar configurations apply to larger test sets and remote test units, like RTU-300+)
![]() For a step-by-step guide on how to run Speedtest® on the PX90 (V90-series) test set, please refer to the PX90 Quick Start Guide. However, you should still read all the theory and information from this article.
For a step-by-step guide on how to run Speedtest® on the PX90 (V90-series) test set, please refer to the PX90 Quick Start Guide. However, you should still read all the theory and information from this article.
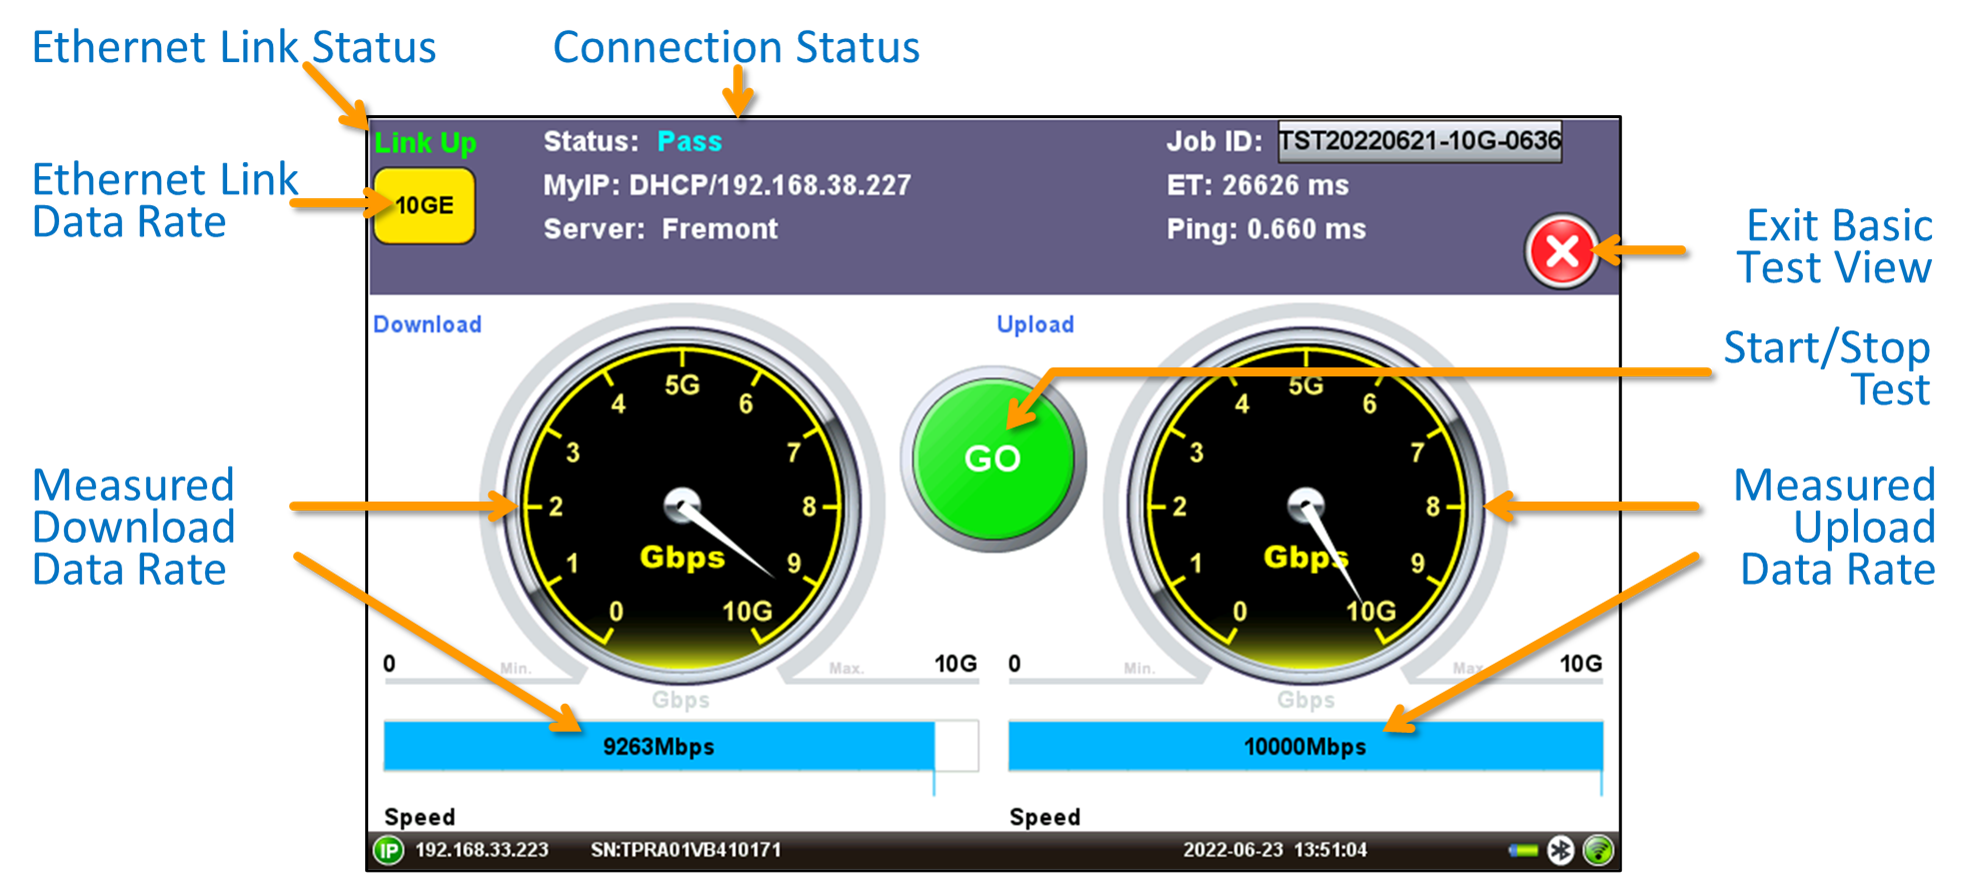
1.1 Basic V-TEST View
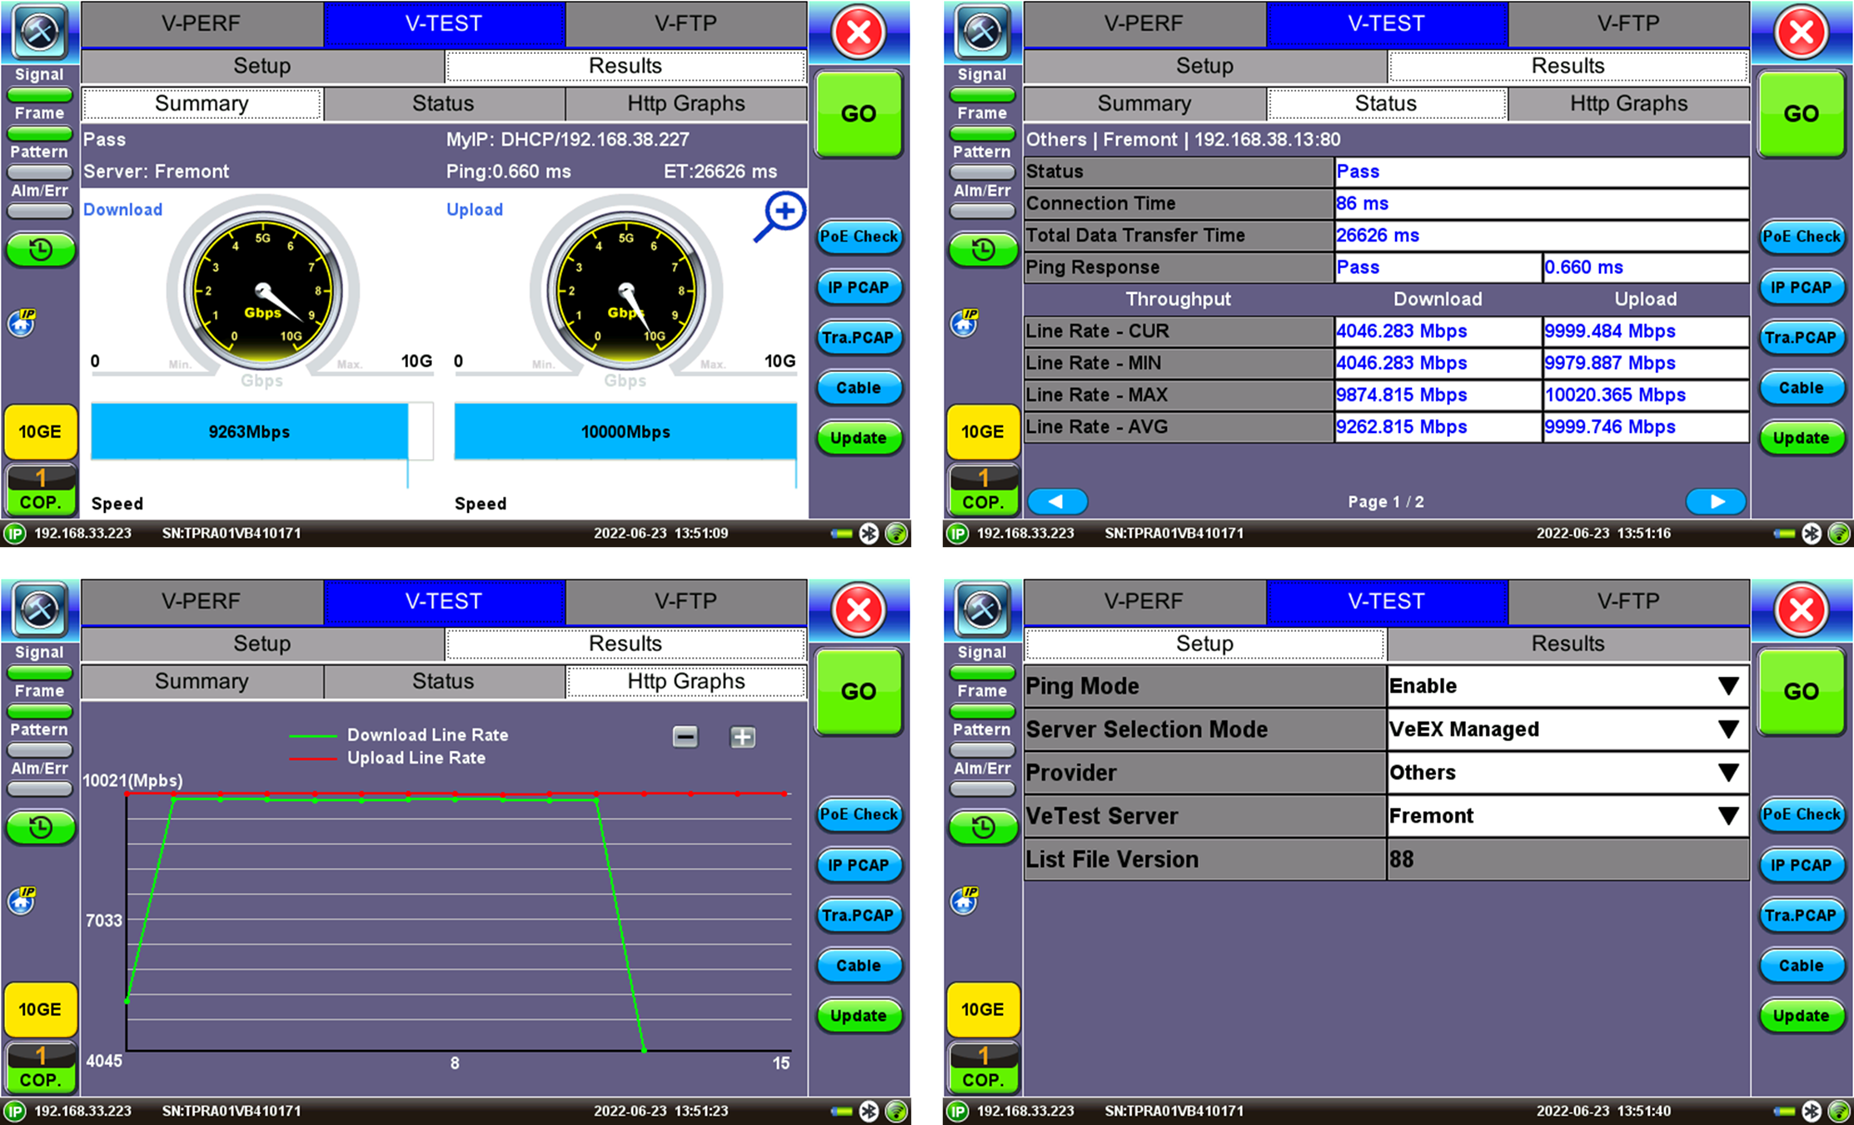
1.2 Full V-TEST Results View & Setup
Press the (X) icon to access more test details. The different tabs provide access to detailed test Results (Summary, Status, Graphs), Setup (manual configuration), and offers buttons for direct access to other related troubleshooting test tools. Tap on the blue magnifying glass icon to go back to the Basic V-TEST View.

Link Status Indicator Labels & Common Terms
A yellow status box will be displayed when the link has been properly established with the port under test and it is considered active.
10GE: 10 Gbit/s, 10GBASE-T copper interface (RJ45 UTP) or 10GBASE-X optical interface (LC-UPC duplex)
5GE: 5 Gbit/s, 5GBASE-T copper interface (RJ45 UTP) or 5GBASE-X optical interface (LC-UPC duplex)
2.5GE: 2.5 Gbit/s, 2.5GBASE-T copper interface (RJ45 UTP) or 2.5GBASE-X optical interface (LC-UPC duplex)
1GE: 1 Gbit/s, 1GBASE-T copper interface (RJ45 UTP) or 1GBASE-X optical interface (LC-UPC duplex)
1000T: 1 Gbit/s, 1000BASE-T copper interface (RJ45 UTP)
100T: 100 Mbit/s, 100BASE-T copper interface (RJ45 UTP)
10T: 10 Mbit/s, 10BASE-T copper interface (RJ45 UTP)
CAT: UTP cable Category (use Cat 6a or 7 for >1 Gbit/s).
COP: Copper interface (native RJ45 or copper SFP+ adapter). Also referred as Cu or BASE-T.
FDX: Full Duplex
HDX: Half Duplex
UTP: Unshielded Twisted (copper) Pairs cable
2. Advanced V-TEST Modes
2.1 Speed Test Server Selection Modes
Auto – This is the default and recommended server selection for the Ookla® Speedtest® powered mode. It automatically selects the best speedtest.net server from lists maintained by Ookla.
Manual – Users can manually select a specific Server ID from a list of public Ookla servers.
2.2 Speed Test Modes
Ookla Speedtest – This is the default mode, and it is also known as "Speedtest Powered" mode. It performs internet speed tests by selecting the host from public lists of speedtest.net servers, maintained by Ookla, its partners and/or its customers. the test follows Ookla’s methodology and tests to the Speedtest® Server Network. In this mode, the test is compatible with Ookla’s protocol/methodology; it will scan nearby servers in the local market and test to the server with the fastest (lowest latency) response.
VeEX Managed – Perform internet speed tests by manually selecting servers from lists created and maintained by VeEX. These non-public lists are created with specific customers in mind and can be updated by connecting the test set to the Internet and pressing the Update button. In VeEX Managed mode, the customer’s servers are added to a customer server list that is maintained and managed by VeEX for the end-user’s ease of use and convenience. The full list of server IP addresses or URLs must be provided to VeEX. Once added, all the users have to do is to select the server from their company's list and initiate the test to the selected server.
User Managed – Advanced users can perform internet speed tests by manually selecting servers from lists manually created by the user, using the Manual mode. In User Managed mode, the user is allowed to enter the server IP/URL and save it to a server list that they can maintain and manage on their own.
Manual – Advanced users, with detailed knowledge of their Speedtest servers, can manually add their own servers, test files and maintain their own server lists.
2.3 ISP & Sponsored Server Selection Modes
V-TEST or Speedtest® verify/certify the Internet Access data rates. Which are the rates advertised by the Internet (access) Service Provider (ISP), from the customer's premises to the point of entry to the Internet. For that reason, the selection of the centralized speed test server is very important.
Before starting the Download and Upload throughput tests, the test set pings nearby servers, then it generally selects the one that has the fastest ping response. However, the nearby Ookla® servers would be a combination of ISP-owned or sponsored servers, and some other servers that are hosted by independent companies, which may reside outside of the footprint of the ISP providing the service. Testing to a server that is not owned/sponsored by the ISP may not guarantee reliable test results, since the server has not been vetted by the ISP providing the service.
Turning the ISP/Sponsor Match setting ON, instructs the test set to prioritize the server search for servers that are sponsored by the ISP and select one of these servers for testing. If no ISP-sponsored servers are found, then the test set would carry out its normal search for the fastest ping-response server.
2.4 How Does Speedtest.net Work?
Please follow this Ookla link for more details.
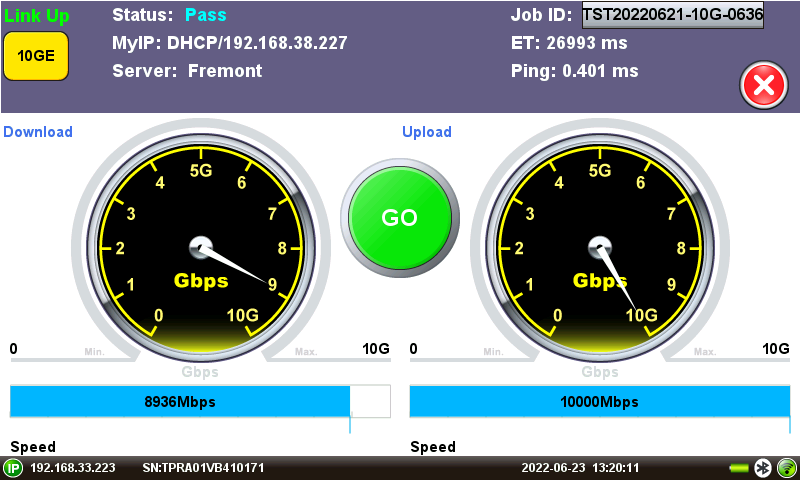
3. Start the Test
- Turn the Test Set ON and navigate to the V-TEST feature in Ethernet testing mode.
- Use the appropriate copper Cat6a/7 RJ45 (UTP) or fiber duplex-LC test cord to establish a physical connection between the port or device under test (DUT) and the corresponding test port on the test set. If using optical interfaces, turn the laser ON.
- Verify that the link is UP and OK.
- Press the green GO button to start the Internet speed test.
- The test set identifies the internet service provider (ISP) and searches for the closest Ookla Speedtest® server, based on round-trip response times.
- Then it runs the Internet speed test for the Download direction (from server to test set), then the Upload (from test set to server) and displays the results.
- Once finished, the GO button will turn back to green. It is ready to save the results and/or run more tests.
IP Addresses
![]() MyIP (also known as 'Home IP') is the IP address assigned to the active Test Port and the one used for testing purposes. Tap on the icon to display the current IP address assigned to the active port.
MyIP (also known as 'Home IP') is the IP address assigned to the active Test Port and the one used for testing purposes. Tap on the icon to display the current IP address assigned to the active port.

The IP address displayed at the bottom-left corner of the screen is the test platform's management connection (WiFi or LAN) used by system's features, like remote control, software updates, etc. In smaller handheld test sets, LAN connections may require an optional micro-B USB to RJ45 Ethernet adapter cable.
4. Save the Results
 Press the SAVE button, use the touch-screen keypad to enter the name (overwrite or edit), and tap on Apply.
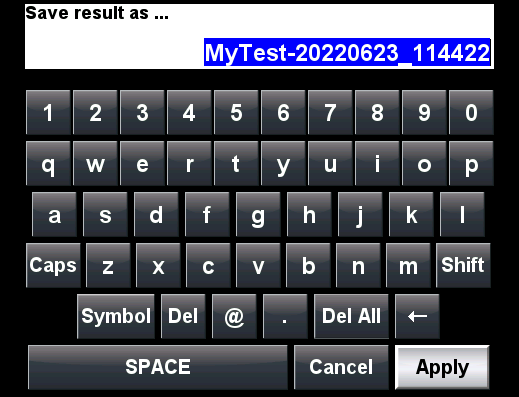
Auto-Naming: By default, the test set auto-naming feature uses the current date and time to generate a default unique name for every test result (YYYYMMDD_hhmmss). Users can overwrite the auto name or define a specific prefix to be added to it (e.g., to identify site, cabinet, rack, customer or the technician running the test). To configure the prefix, press the (X) icon, then the ![]() Tools icon, go to the System Utilities tab, select Global Setting, Storage Setting and enter the desired prefix in the File Name Prefix field (e.g., MyTest-). From then on, all tests would be auto-named MyTest-YYYYMMDD_hhmmss.
Tools icon, go to the System Utilities tab, select Global Setting, Storage Setting and enter the desired prefix in the File Name Prefix field (e.g., MyTest-). From then on, all tests would be auto-named MyTest-YYYYMMDD_hhmmss.
If the Advanced Saving option is turned ON, a secondary form is displayed to enter extra information about the Job ID/Work Order, technician, location, and comments. This would create more complete test reports and it is required if the test set is registered to the centralized R-Server workflow & results management system.
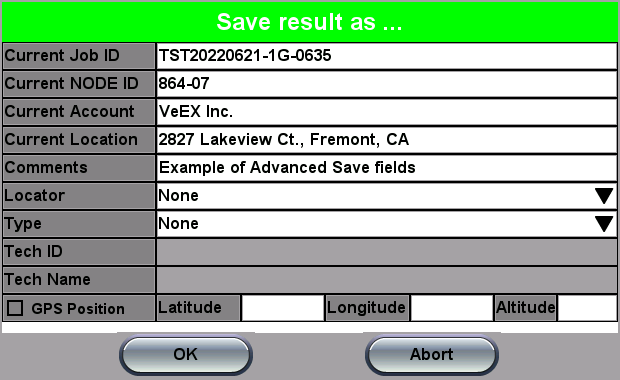
Advanced Saving: To append extra information to test reports, press the (X) icon, then the [Tools] icon, go to the System Utilities tab, select Global Settings, Storage Setting and turn the Advance Saving field to ON.
5. See Results & Generate Test Reports
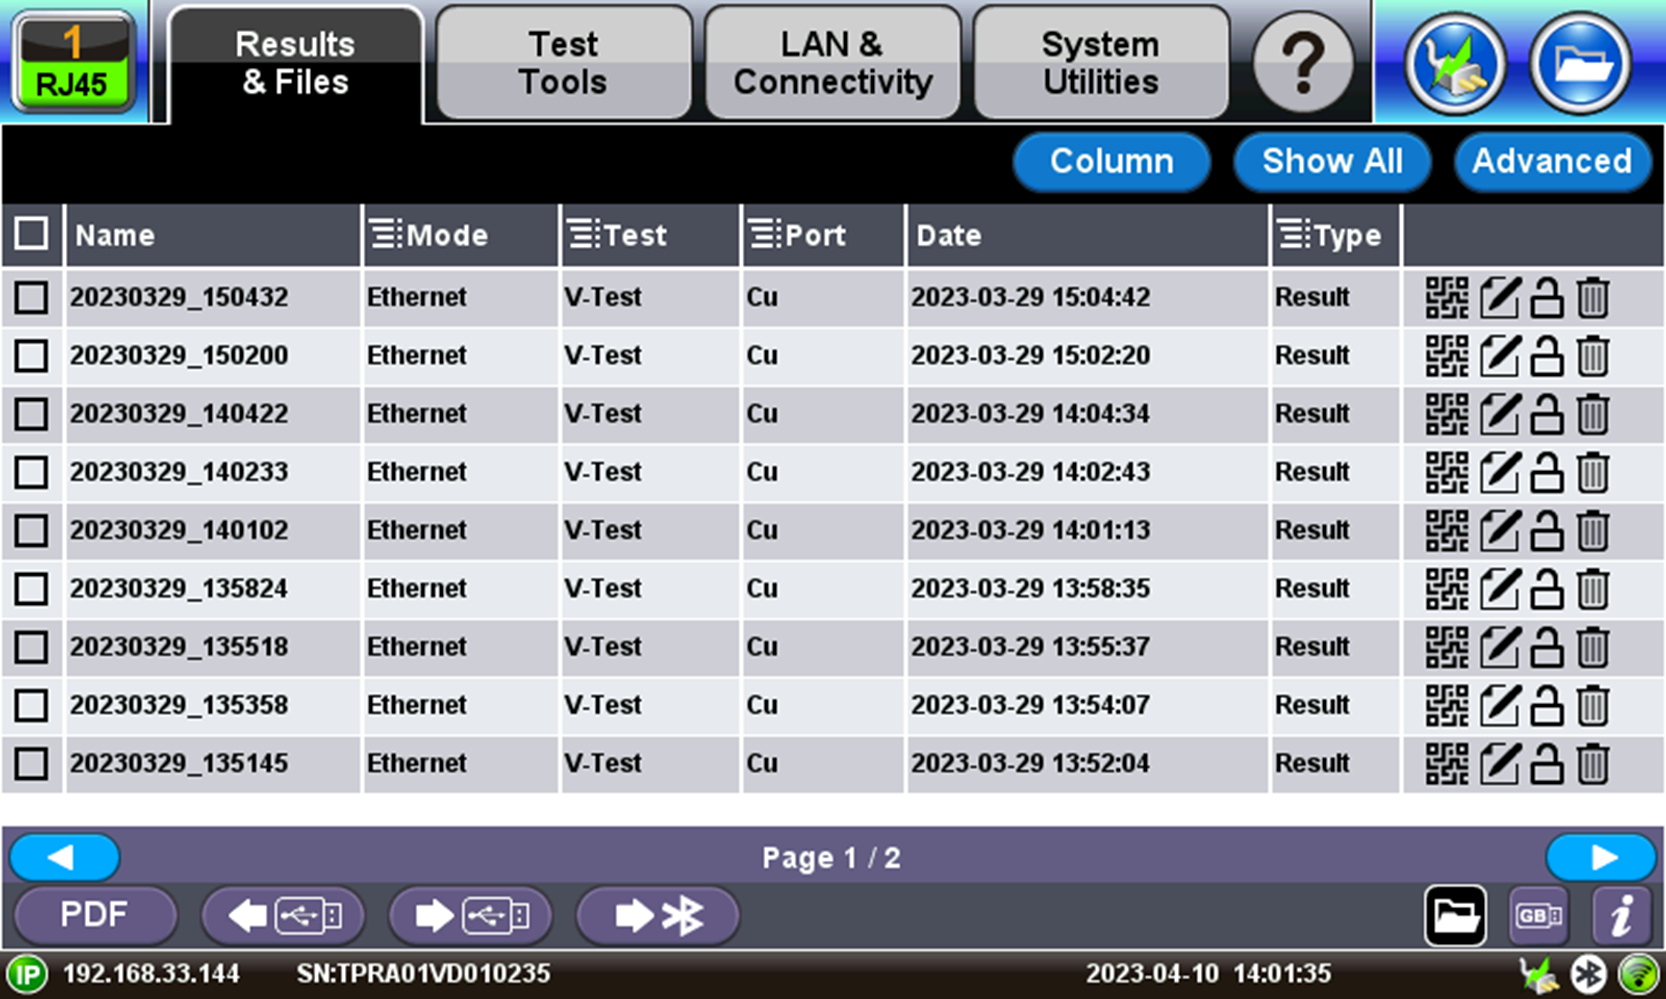
To access the test results stored in the test set, press the (X) icon, then the [Tools] icon, go to the Results & Files tab, and select Saved to access the File Manager.

or
Select the desired file (tap on View if required) to open the test report. To navigate the report, use the links in its Table of Content and the right rocker switch to scroll Up and Down.
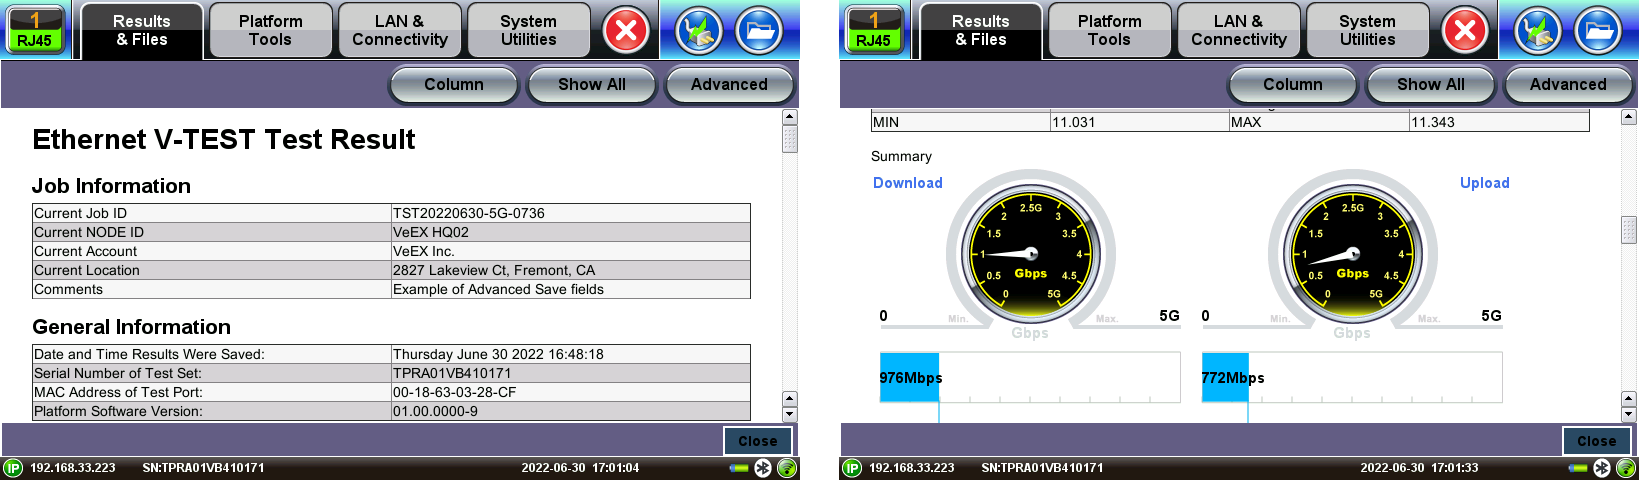
View: Opens the selected test report (select one report at a time). In products with newer software versions, just tapping on the row should open the selected test results.
![]() Close: Closes the current test report and goes back to the File Manager.
Close: Closes the current test report and goes back to the File Manager.
![]() Del.: Deletes all unlocked test reports that are selected with checkmarks.
Del.: Deletes all unlocked test reports that are selected with checkmarks.
![]() Rename: Renames the selected test report (one at a time).
Rename: Renames the selected test report (one at a time).
![]()
![]() U/L: Unlocks or Locks test reports. Locked reports are identified by a red padlock icon. Locked test reports cannot be deleted or renamed.
U/L: Unlocks or Locks test reports. Locked reports are identified by a red padlock icon. Locked test reports cannot be deleted or renamed.
![]() NoApp: Generates a QR code for contactless results transfer to smartphones and tablets. Users scan the QR code to download the results and generate reports.
NoApp: Generates a QR code for contactless results transfer to smartphones and tablets. Users scan the QR code to download the results and generate reports.
![]() PDF: Generates a PDF copy of the test report and stores it in an attached USB memory stick (required) for distribution (e.g., via email).
PDF: Generates a PDF copy of the test report and stores it in an attached USB memory stick (required) for distribution (e.g., via email).
![]() From USB: Imports (restores) all test results, test profiles and screenshots stored in an attached USB Memory Stick. The included On-The-Go (OTG) micro-B USB to USB-A adapter cable is required for the USB memory stick.
From USB: Imports (restores) all test results, test profiles and screenshots stored in an attached USB Memory Stick. The included On-The-Go (OTG) micro-B USB to USB-A adapter cable is required for the USB memory stick.
![]() To USB: Exports (backup) all selected test results, test profiles and screenshots stored to an attached USB Memory Stick. The included On-The-Go (OTG) micro-B USB to USB-A adapter cable is required for the USB memory stick.
To USB: Exports (backup) all selected test results, test profiles and screenshots stored to an attached USB Memory Stick. The included On-The-Go (OTG) micro-B USB to USB-A adapter cable is required for the USB memory stick.
![]() BT: Transfers selected test results, test profiles and screenshot files to a paired Bluetooth® smartphone, tablet or PC. (Pairing procedure varies by computing device and operational system.)
BT: Transfers selected test results, test profiles and screenshot files to a paired Bluetooth® smartphone, tablet or PC. (Pairing procedure varies by computing device and operational system.)
![]() Internal test results and profiles storage (File Manager).
Internal test results and profiles storage (File Manager).
![]() Browse files and folders in attached (external) USB memory stick.
Browse files and folders in attached (external) USB memory stick.
![]() Information about the internal user data storage available capacity.
Information about the internal user data storage available capacity.
Related Test Solutions
- FX120 - XGS-PON Analyzer & Multi-Gigabit Internet QoE Test Set
- MTX150x-Lite - Multi-Gigabit Internet Services Test Set
- MTX150x - Multi-Gigabit Ethernet Services Installation Test Set
- MTTplus-340 - Advanced Multi-Service Test Module
- PX90 - PON Service Installation Meter
- TX340s - Advanced Multi-Service Test Set up to 16G
- TX300s-100Gx - Advanced Multi-service Test Set up to 100G
- RXT-3400 - Advanced Multi-service Test Set up to 16G
- RXT-6200 - Advanced Multi-service Test Module up to 2x100G
- RTU-300+ - Centralized Modular Test Platform
- RTU-340 & RTU-600x - Remote Test Unit/Ethernet/IP Test Module