
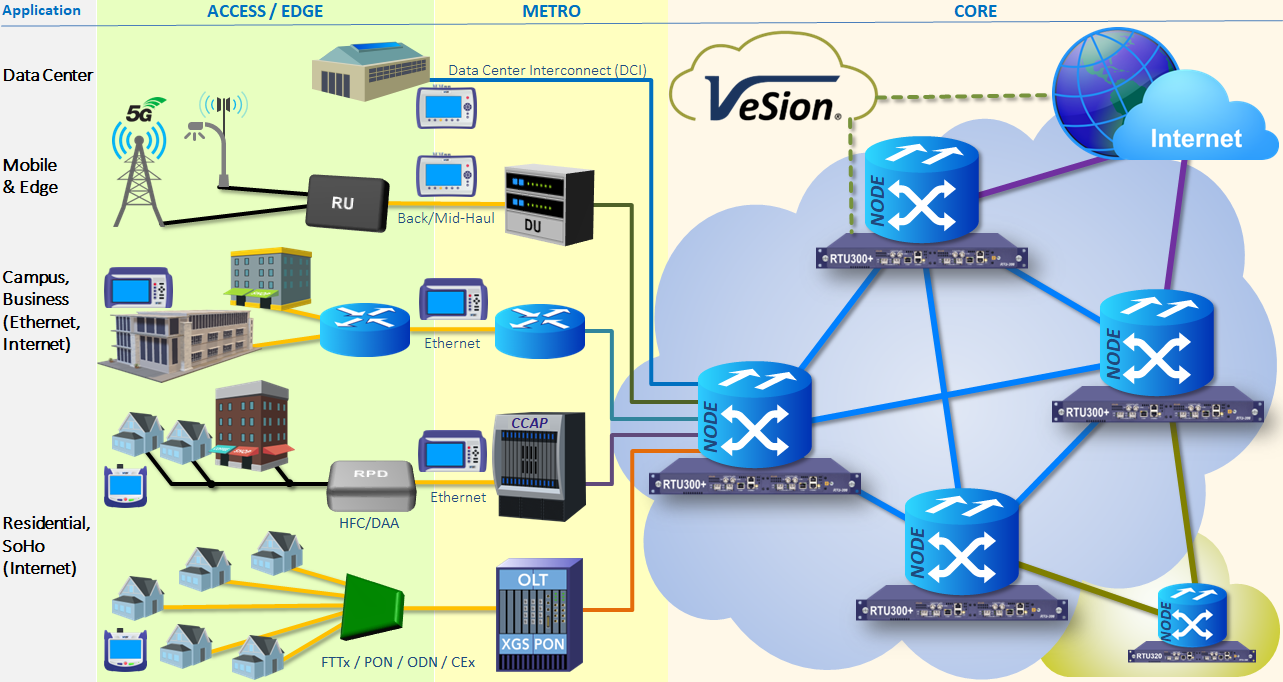
In summary, VeSion is a centralized, distributed or cloud system that uses a server (group of servers or cloud) to control multiple geographically dispersed test heads (and portable field test equipment), gather results, correlate data and build a comprehensive view of the health of the Ethernet/IP network and services. RTUs can be used to run tests on demand (triggered by events or job orders) or to proactively monitor the health of links (scheduled tests), etc. VeSion mode focuses on testing modern Ethernet & IP interconnect, metro, edge and access network fabrics, as well as assisting in Quality of Service (QoS) and Experience (QoE) verification for high-speed Internet access services.
Multiple RTU-300+ can be integrated to and controlled by the VeSion centralized test, monitoring, workflow and data management system. This requires a VeSion system, servers/cloud, main license, user licenses, registered RTUs, etc. This section focuses only on the RTU-specific settings required to establish a connection with the VeSion system, so VeSion administrator(s) can take control of the RTU and integrate it into the company's org chart and processes.
In VeSion mode, the RTU-300+ is an Ethernet-oriented (Layer 1 to 4+) test probe.
Notes: The VeSion web user interface may change over time as new features, functions and improvements get added.
Certain test modules may not be initially supported in the VeSion environment. Please check the latest software release notes for updates.
1. Getting Started
Refer to the Web Remote Access (recommended) and Probe Configuration Tool guides to have the target RTU configured in VeSion Operating Mode, with the basic VeSion server settings and properly connected to the LAN, with the assigned IP addresses.
 Once under VeSion control, the RTU test functions will need to be accessed through the VeSion (server) page, using the user credentials created in VeSion (not the local ones previously created in the RTU itself). User management and credentials are centralized in the VeSion system. The RTU will act as a remote test probe, controlled by the VeSion system.
On a computer, launch a web browser (Chrome is recommended) and point it to the VeSion Server's IP address or URL, using the https:// prefix, and login with Manager level credentials (User ID and password), to have access to the settings.
Click on ![]() to use VeSion in full screen mode and expand the top menu icons.
to use VeSion in full screen mode and expand the top menu icons.

The ![]() Menu, on the top-right, provides the most important settings to manage the VeSion system, probes (e.g., RTUs), tests and users. This menu will be different, depending on the types of probes being managed by VeSion and users' privileges.
Menu, on the top-right, provides the most important settings to manage the VeSion system, probes (e.g., RTUs), tests and users. This menu will be different, depending on the types of probes being managed by VeSion and users' privileges.


Different types of VeSion users have access to different functions, based on privileges assigned and the types of probes being used. Some users may not have access to User Management, System Configuration or Manage Software features.
2. Managing VeSion Users
Click on the ![]() Menu or
Menu or ![]() Settings section, select User & Group, then select the User tab on the top bar (if the menu is collapsed, click on the V to expand the drop-down menu).
Settings section, select User & Group, then select the User tab on the top bar (if the menu is collapsed, click on the V to expand the drop-down menu).

- Click on the Add New (first row), to create a new row for a new user.
- Select Tester from the Group drop-down menu.
- Assign the user to the appropriate level on the ORGanization chart, if applicable.
- Input the Name, User ID, Password and any other information, then click on Create.
To test the newly created user, log out and log back in using the new credentials to confirm that only Tester privileges are available.
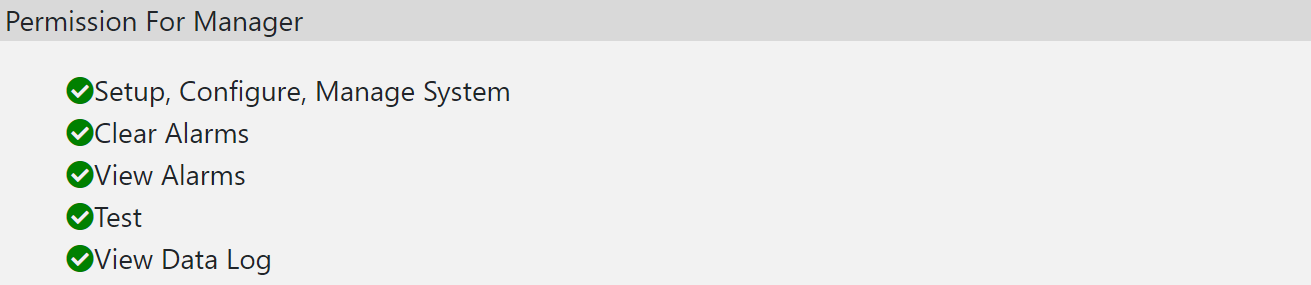
User Groups (Types) & Privileges
The Group menu allows VeSion administrator(s) manage different types of user access levels, with different permissions, such as Manager, NOC Operator, Supervisor, Tester, etc.
3. Configuring Test Probes & Test Ports
Go to ![]() Menu >Settings >Server & Device. Select the desired VeSion server (on the left). On the top bar, select the RTU300+ tab to filter on that type of probes.
Menu >Settings >Server & Device. Select the desired VeSion server (on the left). On the top bar, select the RTU300+ tab to filter on that type of probes.
The tree on the left displays all the different RTU-300+ probes managed by that VeSion server. VeSion servers are identified by server number, customizable name/alias in parentheses, followed by their IP address.
Select the target probe to perform the basic configuration for its physical test ports (test resources). Each probe can be assigned a Name and Location for easier identification.
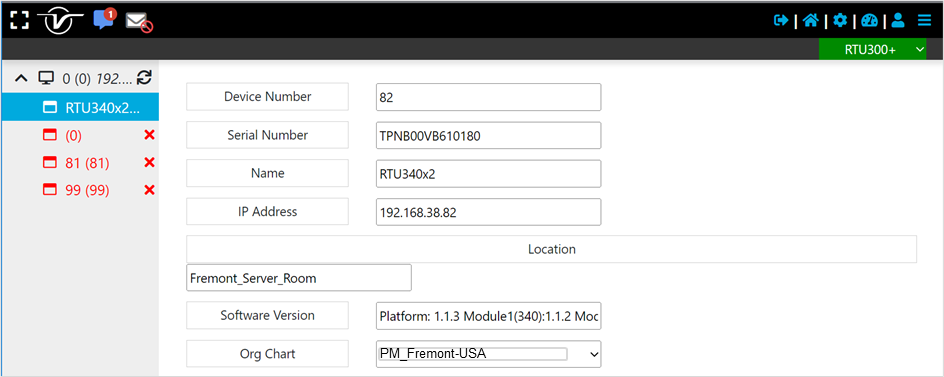
If multiple probes (in different locations) are being managed by a VeSion server, it is recommended to create an Organization chart structure, to organize and assign the probes into different groups/teams, sites/premises, cities, regions, etc.
To configure each of the physical test ports, select the desired module Slot (module number) tab, then the test Port group, assign the required physical test Port Type (physical test interface), Test Rate and assign the required main mode of operation in Test Mode. Make the setup for each of the test port groups in the RTU, so they are configured to fit the intended or expected applications. All tests must be stopped before changing the Test Mode for any port.
The choice of Test Mode will define the actual test applications available when running tests and can only be changed at this level. For example, by selecting Layers 2/3/4, the port will give you access to Loopback mode, Throughput, RFC2544 and V-SAM (Y.1564) tests applications. If Layer 4 Stateful TCP mode is selected, then you will be able to use it for V-PERF (RFC6349, iPerf3) tests.

The available Test Modes on RTU-300+ will depend on the type of test module, software version, test port used, and rates selected. (Certain test modules may not be supported by VeSion, check the software release notes for updates.)
Some examples are:
- Layer 2/3/4 - Enables running Loopback mode, Throughput, RFC2544 and V-SAM (Y.1564) tests on the selected test port.
- Layer 4 with Stateful TCP - Enables running V-PERF (RFC6349) test on the selected test port.
- Layer 4 with Stateful TCP and RS-FEC - Enables running V-PERF (RFC6349) test on the selected high-speed (≥25G) test port.
Dual port tests capabilities are achieved by configuring two ports independently.
The following Test Modes are available for the older RTU-320:
- 1GE Dual Port L2 & L3 Testing - Enables running the 1GE Loopback, Throughput, V-SAM, and RFC2544 tests on both ports.
- 1GE Dual L4 Stateful TCP Testing - Enables running the 1GE V-PERF test on both ports.
- 1GE Dual L4 Stateful TCP Testing + L2 & L3 Testing - Enables running 1GE Loopback, Throughput, V-SAM, and RFC2544 tests on one port and 1GE V-PERF test on another.
- 10GE Dual Port L2 & L3 Testing - Enables running 10GE Loopback, Throughput, V-SAM, and RFC2544 tests on both ports.
- 10GE Dual L4 Stateful TCP Testing - Enables running 10GE V-PERF test on both ports.
- 10GE Dual L4 Stateful TCP Testing + L2 & L3 Testing - Enables running 10GE Loopback, Throughput, V-SAM, and RFC2544 tests on one port and 1GE V-PERF test on another.
- 1GE/10GE Dual Port L2 & L3 Testing - Enables running 1GE Loopback, Throughput, V-SAM, and RFC2544 tests on one port and 10GE Loopback, Throughput, V-SAM, and RFC2544 tests on another.
Note: These Layer configurations in the Test Mode field are systemwide configurations and they can only be changed and applied if no tests are running in the target RTU. For example, to change one port from Layer 2/3/4 to Layer 4 with Stateful TCP mode, all tests need to be stopped first. Once the new Test Mode has been applied, all the tests can be restarted.
Scroll down to the IP Configuration section, to modify the basic settings for each of the test ports, such as MAC address, IP address mode and information, VLAN ID and Priority as required for each of the links, ports or devices under test.
Each test port has a unique and valid source MAC address assigned at the factory. It is recommended to keep the factory MAC default, unless the test environment or application requires cloning specific source MAC addresses.
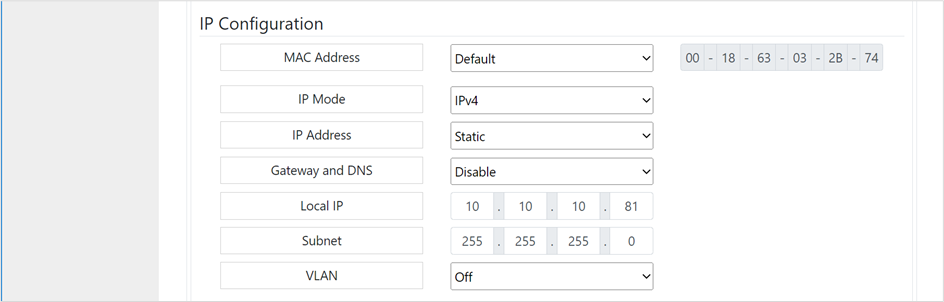
Note: If you only plan to run Layer 2 tests, you may ignore the IP Configuration and leave the default values. The IP Configure section of the Port Status may display FAIL, which would be OK in that case. However, it is recommended to assign valid IP addresses to them, for added flexibility.
Click on Save when finished. All the port configuration changes are applied to the RTU. The RTU-300+ will display a progress pop-up while the changes are being applied and verified.

While the changes are being applied, the In Progress status may also be displayed in front of Port Configure line. When the configuration is done, the Pass or Succeeded status will appear.

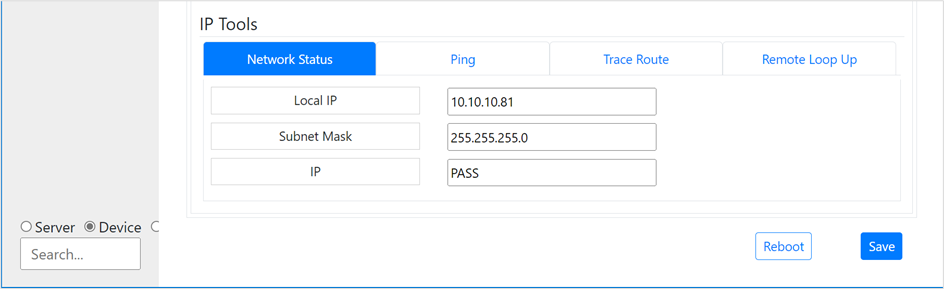
If testing an Internet/IP link, click on the Network Status tab to verify that the IP Configuration status and layer 3 connectivity are OK. It should display Pass for IP and Gateway. It also provides some basic configuration verification/troubleshooting features in the IP Tools section, such as Ping and Trace Route, as well as a Remote Loop Up feature that adds the ability to loop up/down compatible remote devices at the far end (with layers 2, 3 or 4 address swap).
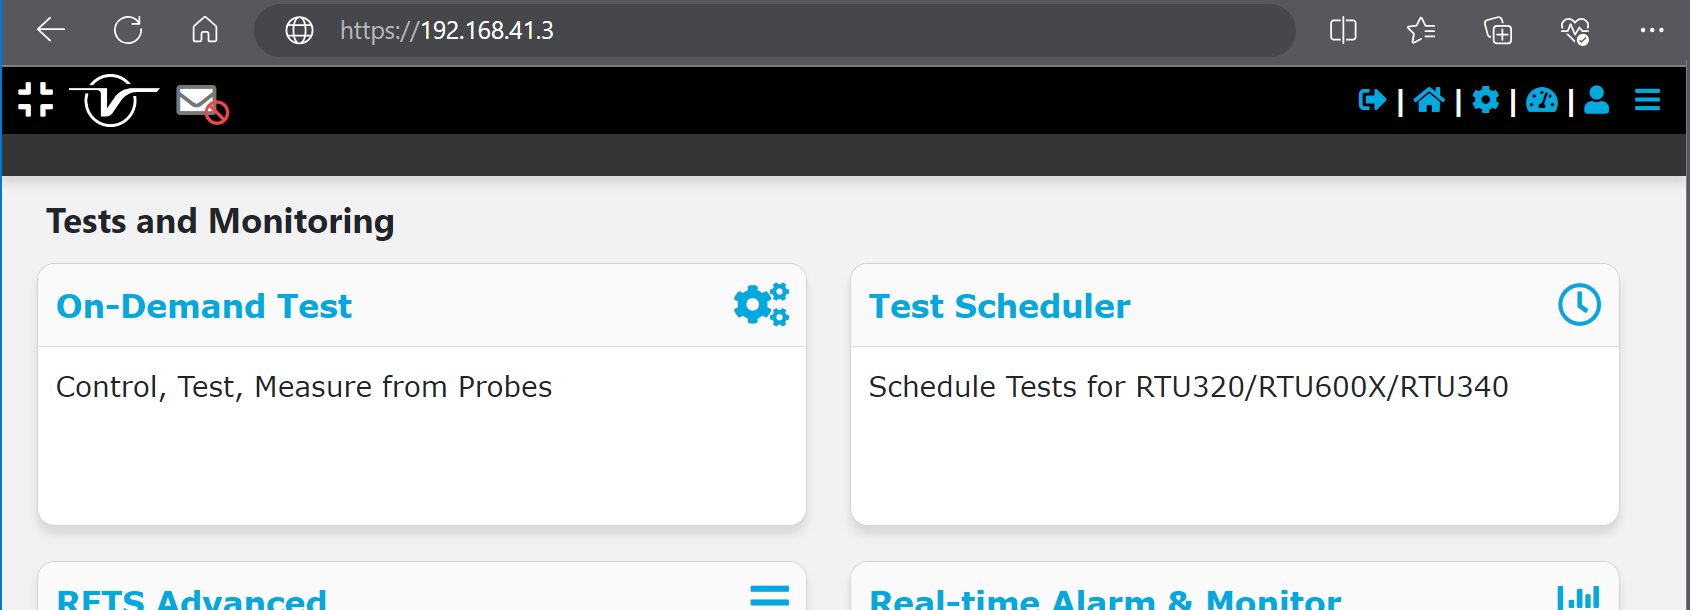
4. Running On-Demand Ethernet Tests Via VeSion
Once the basic test port configurations are done, the RTU can be used in different Ethernet, IP and Internet test environments and test scenarios, from simply acting as a centralized Loopback device, to traditional Throughput or RFC2544 tests, validate Service Level Agreements (SLA) with V-SAM (Y.1564), or be set to layer 4+ V-PERF (RFC6349) mode to serve as an iPerf3 server to simultaneously support multiple field test sets running Quality of Service (QoS), Quality of Experience (QoE) and troubleshooting tests for high-speed Internet access and business services.
As an introduction to the different types of test modes supported by the RTU-300+, this section shows some examples based on the RTU-340 test module.
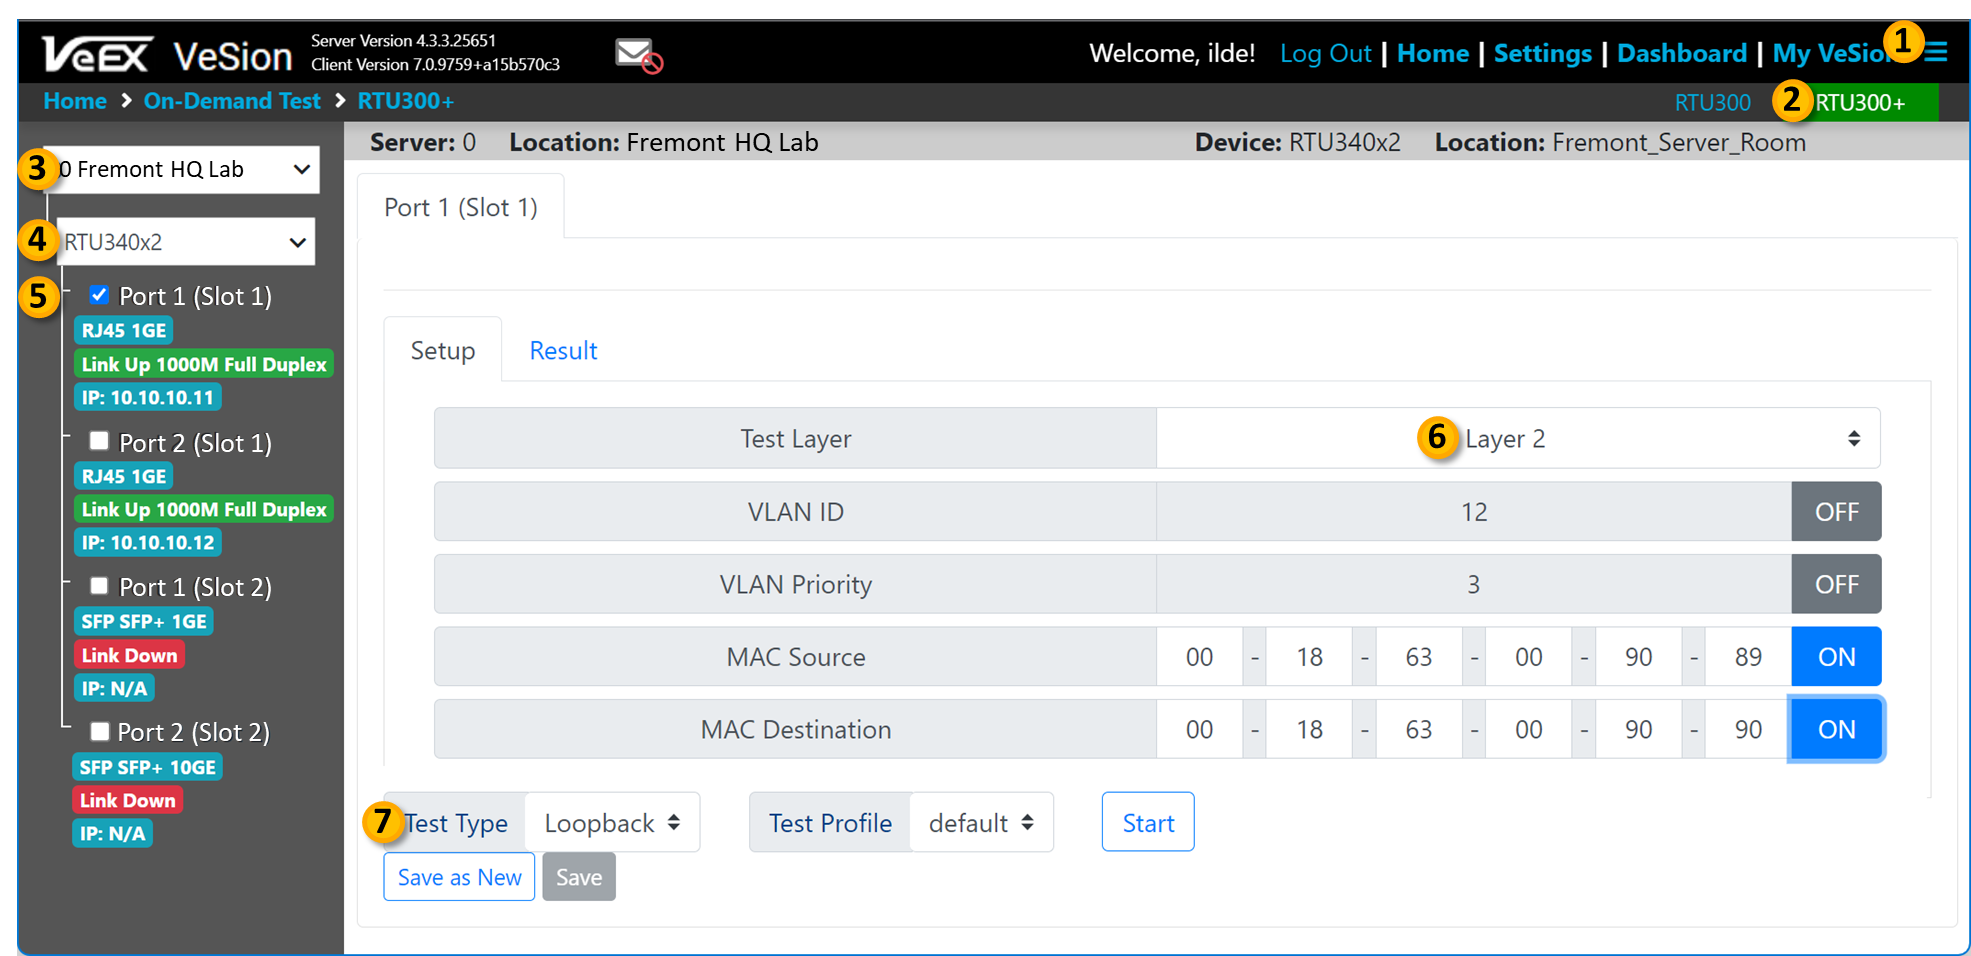
- Open the
 Menu and under the Test and Monitoring section select On-Demand Test.
 - On the top bar, select the RTU300+ tab (green).
- On the left menu, select the required VeSion server.
- Then select the desired RTU300+ probe from the list, to display its test resources (test port groups).
- Use the check boxes to select the desired test port for the test. A summary of the test port configuration and status is shown under each port.
The individual port types and their basic configurations, shown on the RTU's resources tree, are performed in >Settings >Server & Devices.  Select Test Layer required for the test scenario. The choices available will depend on the type of test module, test ports, test mode, etc.
- Use the Test Type field to select the specific test to run. Refer to the sub sections below.
- Configure all the parameters required for the specific layer and the test application selected. Once proven to be correct, these configurations can be saved as Test Profiles, using the Save as New button, for future use.
The different test applications (Test Types) available depend on the test module being used, test port selection and operation layers, amongst others.
It is recommended to save the settings as a Test Profile, once a test configuration has been verified, so it can be recalled later and used for scheduled tests.
4.1 Layer 2/3/4 Loopback Mode
In this mode, all the unicast traffic that arrives to the test port is looped back (retransmitted after swapping their source and destination addresses). Multicast traffic is discarded. Typical applications are Layer 2 and Layer 3 test traffic.
Active loopback modes are often used as a convenient way to provide a centralized active loopback function to field test sets, so they all have access to a reference loopback port(s), to run basic "single-ended" validation and troubleshooting tests, such as BERT, Throughput, RFC2544, etc.
Open the ![]() Menu and under the Test and Monitoring section select On-Demand Test. On the left, select the desired VeSion server and RTU probe, then use the checkbox for the appropriate test port.
Menu and under the Test and Monitoring section select On-Demand Test. On the left, select the desired VeSion server and RTU probe, then use the checkbox for the appropriate test port.
Set the Test Mode field to Loopback.
Users can also turn ON and OFF different filters, so only the packets that match the programmed criteria are looped back (the rest are discarded). For example, only looping back test traffic coming from a specific MAC or IP address (e.g., field test set or RTU).

Press Start to enable the Loopback feature. The page moves to the Results tab (page) to show statics of the traffic, alarms, events, etc.
4.2 Throughput Test
This is the typical Layer 2/3/4 traffic generation function and payload error measurement test, used to lead and stress ports, links, devices, paths, or networks under test.
Open the ![]() Menu and under the Test and Monitoring section select On-Demand Test. On the left, select the desired VeSion server and RTU probe, then use the checkbox for the appropriate test port.
Menu and under the Test and Monitoring section select On-Demand Test. On the left, select the desired VeSion server and RTU probe, then use the checkbox for the appropriate test port.
On the Test Type field, select Throughput. Use the nested tabs to configure the test payload and test traffic parameters. For example:
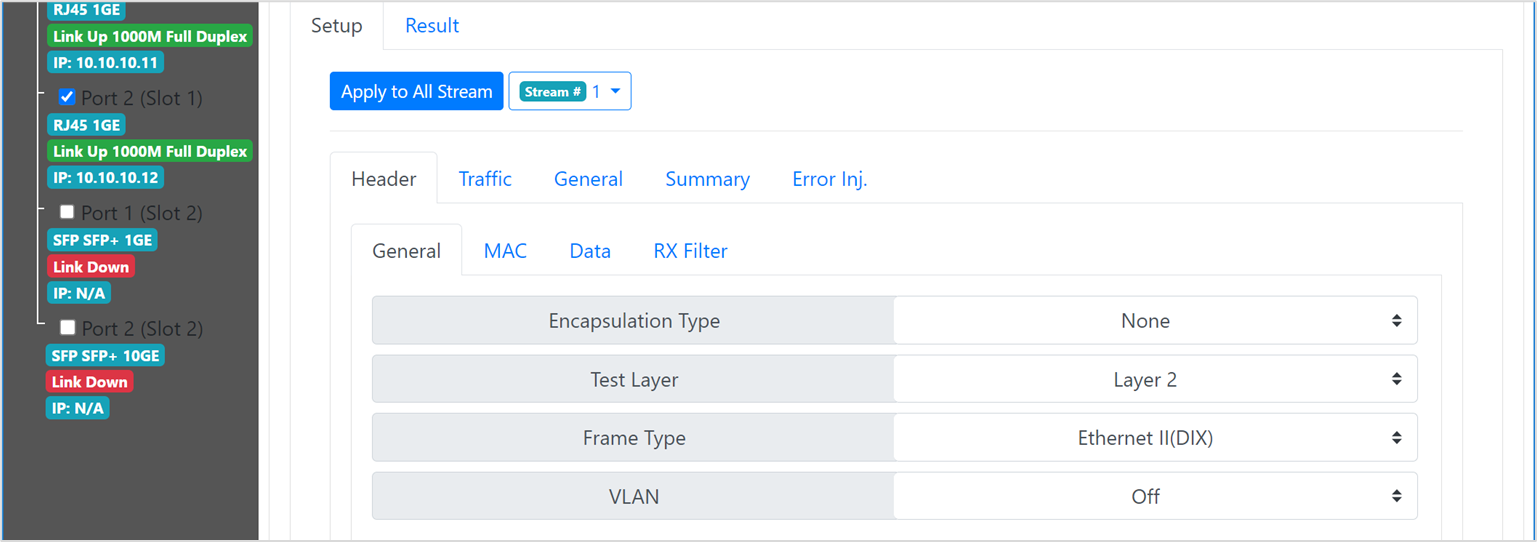


The number of parameters and complexity of the configuration vary depending on the test scenario, including the number of streams being used (up to 16).
Click on Start when ready.
4.3 RFC2544 Test
Open the ![]() Menu and under the Test and Monitoring section select On-Demand Test. On the left, select the desired VeSion server and RTU probe, then use the checkbox for the appropriate test port.
Menu and under the Test and Monitoring section select On-Demand Test. On the left, select the desired VeSion server and RTU probe, then use the checkbox for the appropriate test port.
On the Test Type field, select RFC2544. Use the nested tabs to configure the test payload and test traffic parameters for all the different Layer 2/3/4 tests. For example:

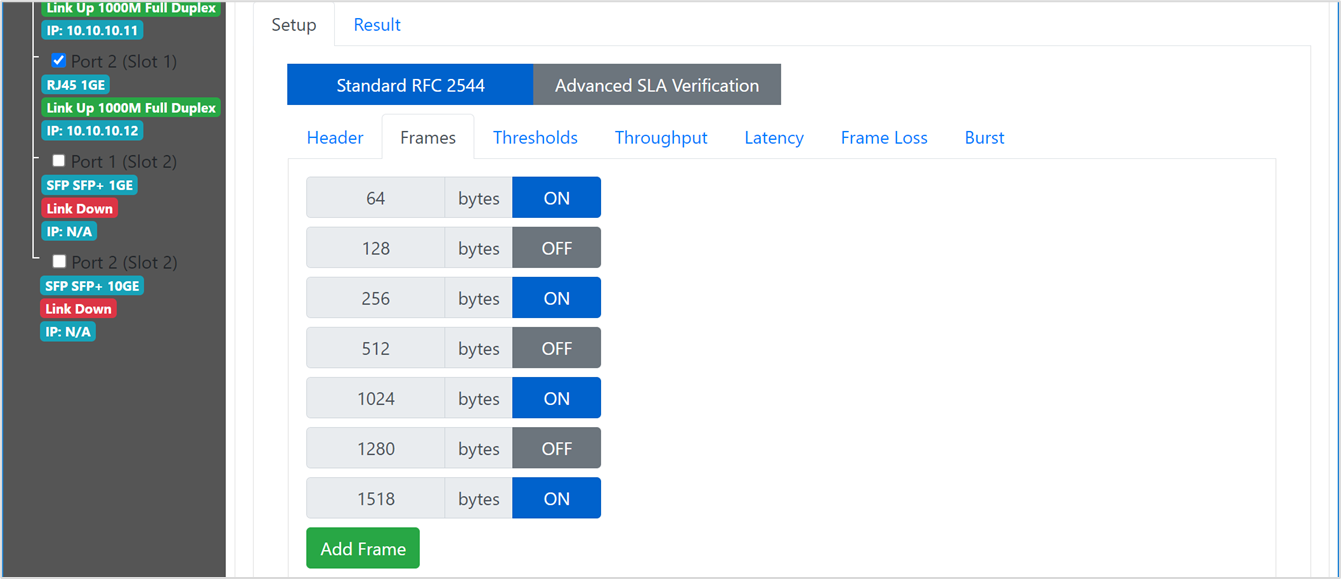

The number of parameters, complexity of the configuration and required test time vary depending on the test scenario, including the number of frame sizes being used.
Click on Start when ready.
4.4 V-SAM (Y.1564) Test
Y.1564 is an Ethernet Service Activation Methodology (SAM) test suite, defined by ITU-T, to be used while installing, bringing into service (activation), and troubleshooting Ethernet-based (business) services. Y.1564 serves as a comprehensive network Service Level Agreement (SLA) validation tool, ensuring that links meet their guaranteed performance, so all services carried by the network will meet their SLA objectives at their maximum committed rate. V-SAM available for Layers 2, 3 and 4.
Open the ![]() Menu and under the Test and Monitoring section select On-Demand Test. On the left, select the desired VeSion server and RTU probe, then use the checkbox for the appropriate test port.
Menu and under the Test and Monitoring section select On-Demand Test. On the left, select the desired VeSion server and RTU probe, then use the checkbox for the appropriate test port.
On the Test Type field, select V-SAM. Use the nested tabs to configure the test payload and test traffic parameters for all the different services. For example:


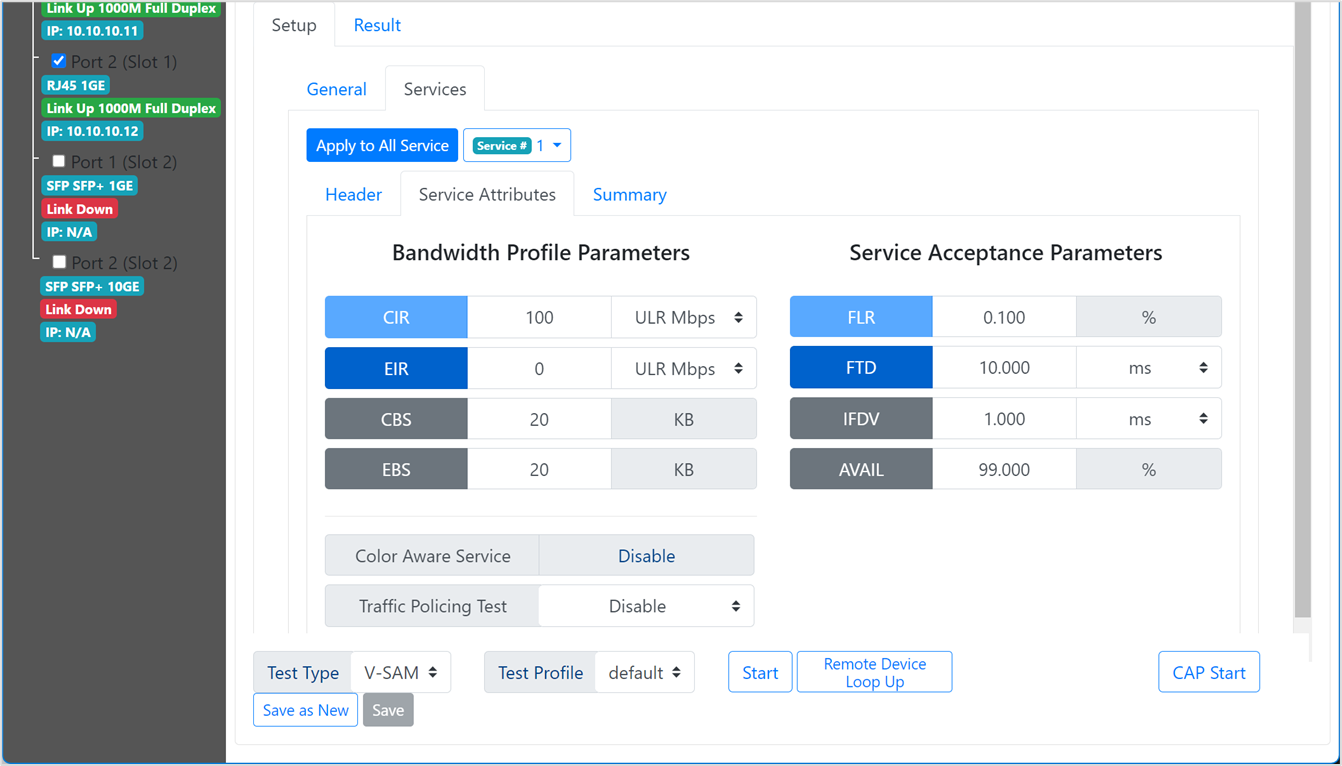
Once all the General and Service parameters are set, save the test profile for future use by clicking on Save as New. Use a relevant name to easily identify the type of test in the future.
Click on Start when ready.
The test results are displayed dynamically. To view the different key performance indicators (KPI) click on the different test Results tabs.
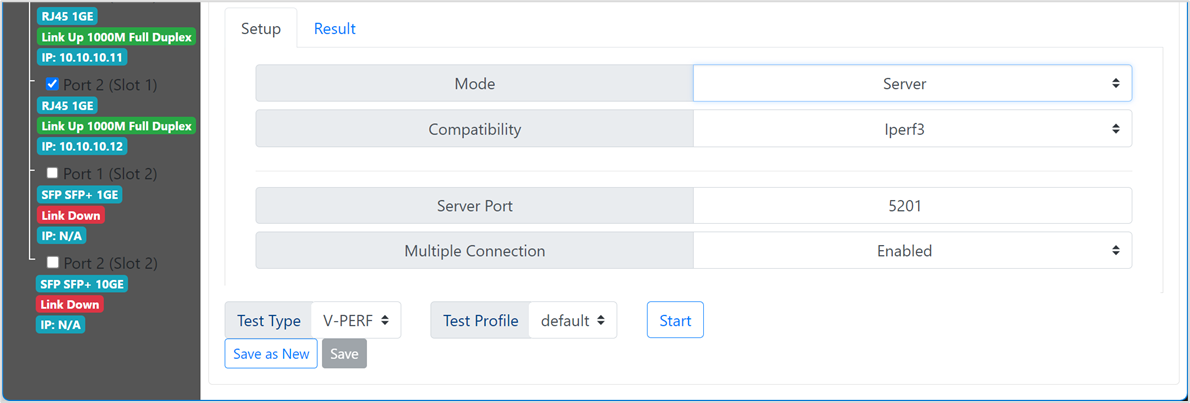
4.5 V-PERF (RFC6349, iPerf3) Tests
Test sets can also support more robust RFC6349 TCP/UDP testing against centralized iPerf servers or dedicated test heads, to evaluate the network's Internet performance for business customers, providing reports with more technical details and results. VeEX's hardware-based test client is called V-PERF and the centralized test heads are RTUs (Remote Test Unit), capable of handling more than 100 field test sets simultaneously, without any drop in performance (using up to 100GE connections at the node). V-PERF is also compatible with existing iPerf3 servers, however, users adopting this approach must be aware of their (servers') CPU-based limitations under stress.
- RFC6349, from IETF, helps service providers optimize their network for transmission control protocol (TCP) traffic and maximize its performance across a broad set of applications. It stresses networks with true stateful TCP test traffic, to assess sustaining TCP performance on the current network/link configuration, using multiple streams in parallel. That is much closer to the subscribers' experience and required by service providers for QoE and SLA verification.
- iPerf (Internet Performance Working Group) is an open-source speed test and network performance measurement tool. It uses multiple TCP and UDP streams to send traffic from one host to another. It helps determine the network's maximum throughput and top bandwidth speed. It can also help optimize the TCP windows for optimal performance. iPerf is based on RFC6349.
This test function is available when the selected test port is configured for Layer 4 Stateful TCP Testing. If in any other test mode (e.g., Layer 2/3/4) all active tests need to be stopped before changing the configuration in the >Menu >Settings >Server & Device page.
The RTU-300+ can act as an iPerf or iPerf3 Server, Client, or Bi-directional, allowing single or multiple connections.
Open the ![]() Menu and under the Test and Monitoring section select On-Demand Test. On the left, select the desired VeSion server and RTU probe, then use the checkbox for the appropriate test port.
Menu and under the Test and Monitoring section select On-Demand Test. On the left, select the desired VeSion server and RTU probe, then use the checkbox for the appropriate test port.
On the Test Type field, select V-PERF. Use the nested tabs to configure the test payload and test traffic parameters for all the different tests. For example:
iPerf Client Mode

iPerf Server Mode
Bidirectional iPerf Server or Client Mode
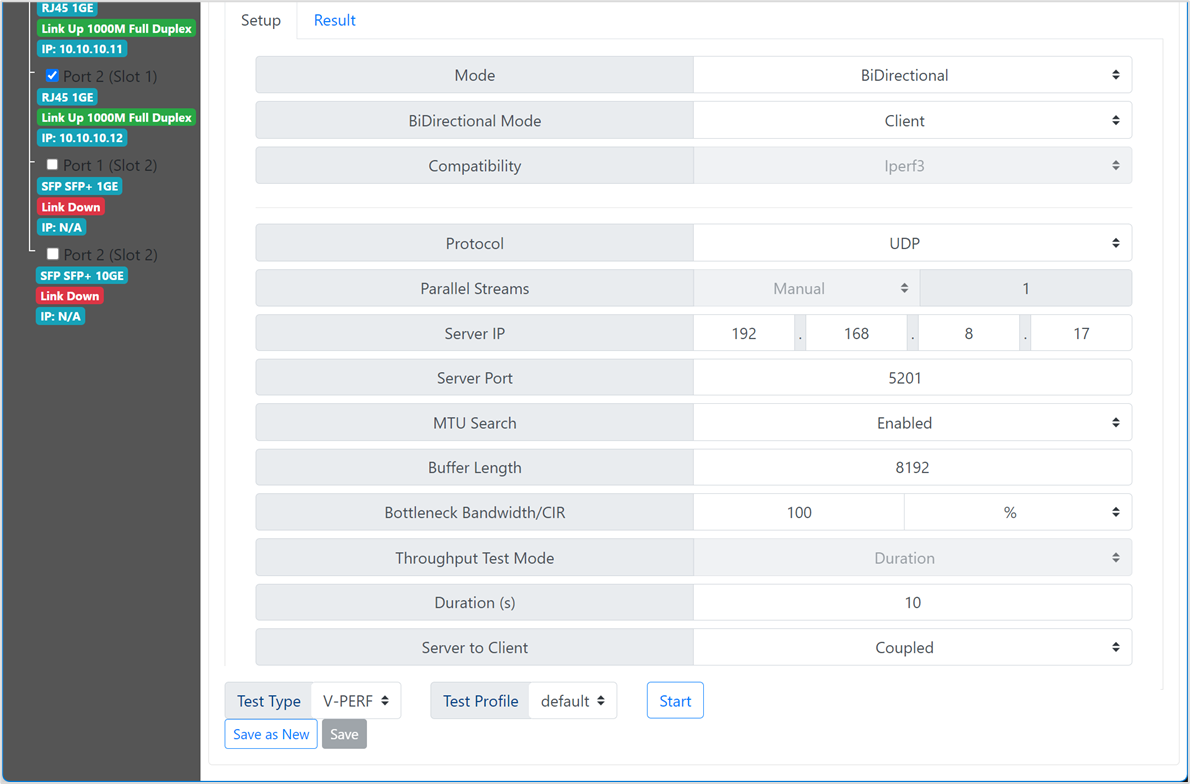
Click on Start when ready.
4.6 Test Results
All saved on-demand test results are available by going into the ![]() Menu >Reporting >RTU300/300+ Results page. The test reports can be filtered by individual Server, RTU, test port, dates, time, etc.
Menu >Reporting >RTU300/300+ Results page. The test reports can be filtered by individual Server, RTU, test port, dates, time, etc.
5. Scheduling Single or Recurring Tests
Each of the test ports in the RTU-300+ can be independently configured to automatically run different tests, based on predefined test profiles and schedules. Use the On-Demand Test function to set and verify the different test configurations required, for each of the test ports, then save each of them as Test Profiles.
- Go to Menu >Test and Monitoring >Test Scheduler.
- Select the (green) RTU300+ tab (or pull-down) from the top bar.
- Select appropriate VeSion server from the pull-down list
- Select the desired RTU-340+ from the pull-down list.
- Use the check boxes to select the target Port # (Slot #).
- On the Test Type field, select the required test application.
- Select a previously saved Test Profile.
- Configure the schedule for the test to run.
- Click on Add schedule test to save it.

This feature can also be used to schedule regular off-hours maintenance reboots for the RTU. as a mean to improve reliability for 24x7 system.