
1. Getting Started
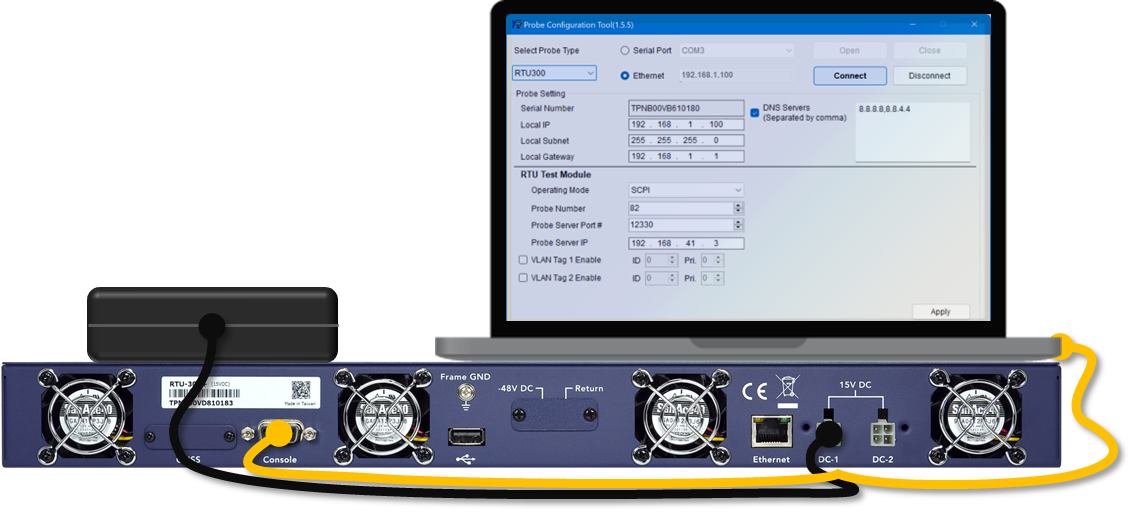
There are multiple ways to perform the initial (basic) configuration of a brand new RTU-300+ (and RTU-300) probe, using its serial Console or Ethernet ports. The Probe Configuration Tool (for Windows PC) is one of the options available (along convenient Web Browser and USB memory stick methods). The use of the Probe Configuration Tool over serial port comes handy when the IP address programmed into an RTU is unknown.
1.1 Installing the Probe Configuration Tool for Windows™
 Download the latest version of VeEX's Probe Configuration Tool application for Windows™, from the RESOURCES section of the RTU-300+ web page. For RTU-300+ use version 1.5.5 or newer.
Users can also go to www.veexinc.com >Support >Software Updates, enter the first four characters of the RTU's serial number (e.g., TPNB) and click on Submit, to get a list all applicable software available. On the Probe Configuration Tool line, click on the link with the Version number to download the installer package and on the PDF link to download the release notes for information.
The Probe Configuration Tool for Windows™ does not require installation, just unzip it, then connect the PC to the RTU. There are two ways to physically connect the PC to the unit:
- Via the Console serial port, using an RS232A cable or USB-A to RS232A adapter (This serial port is configured to 115200 bit/s, 8-bit data, 1 stop bit, no parity).
- Via the Ethernet management port, using a Cat5 UTP LAN cable. Once configured, the Ethernet port is also used to connect the unit to the network, VNC clients, Web Browser or VeSion® server, to further configure the unit and run tests.
(If the RTU's management IP address is unknown, a valid IP address must be first assigned using the Console serial port.)
1.2 Establishing a Connection with the RTU
Once the RTU-300+ and the PC are physically connected:
- Turn ON the RTU, by pressing the
 Power button for two seconds.
 - On the PC, launch the Probe Configuration Tool.
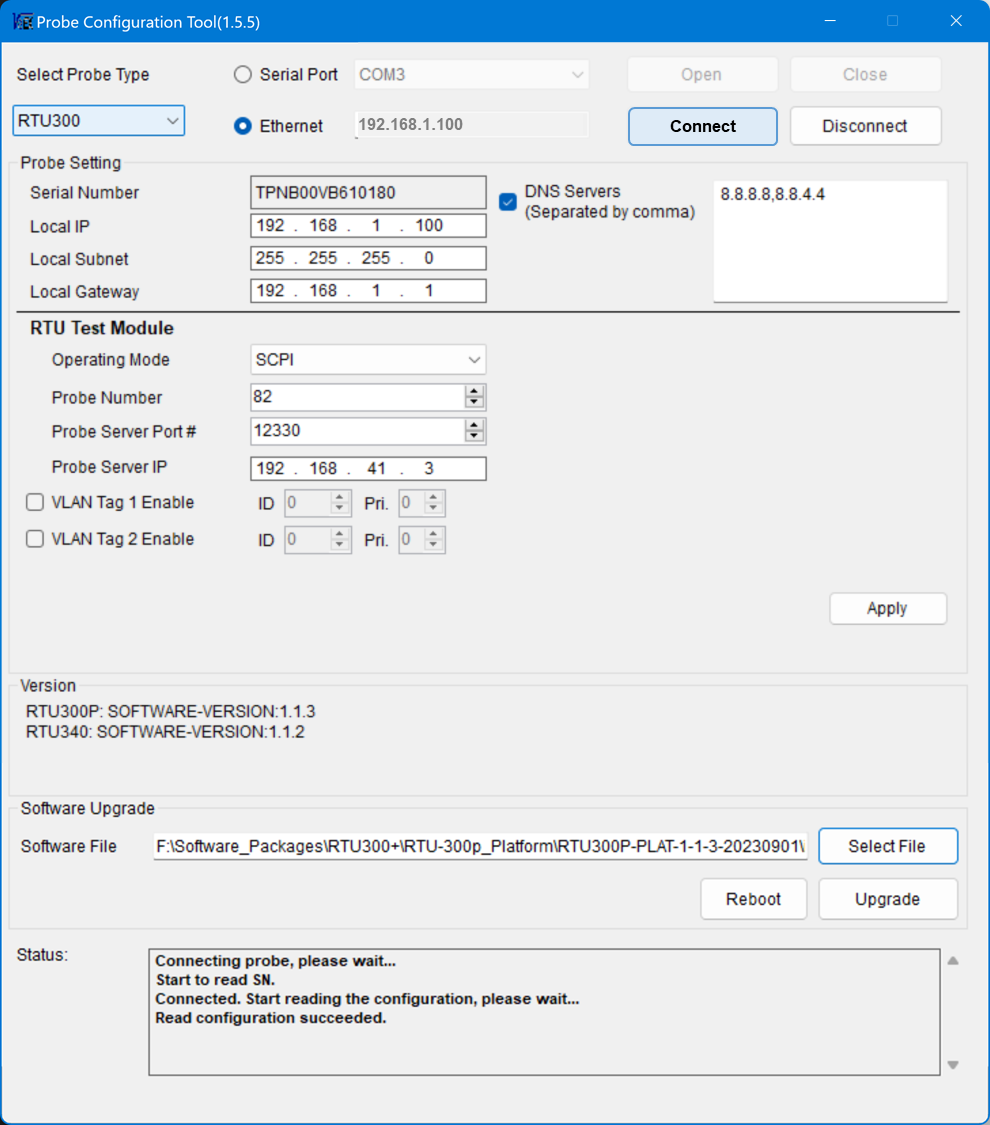
- On the Select Probe Type pull-down, select RTU-300 (for both RTU-300+/RTU300).
- Select between Serial Port or Ethernet connection.
- If Serial Port is chosen, select the correct COM port on the PC and click on Open. Once the Status window (at the bottom of the page) indicates that the serial port is open, click on Connect.
- If Ethernet is chosen, enter the RTU's IP address and click on Connect. For brand-new units, use the factory default IP address 192.168.1.100 or a known IP address previously set by the user. (The default for the older RTU-300 was 192.168.1.1)
- Wait for a few seconds until the fields get populated. Look at the Status window, at the bottom, to monitor the progress.
- If the Status window indicates that a reboot of the RTU is necessary, turn OFF the unit by pressing the
.png?width=19&height=19&name=RTU-300+%20Power%20button%20ON%20(green).png) Power button for four seconds. After waiting a few seconds, turn it back ON. Please keep the Probe Configuration Tool application open and connected during the reboot process as the probe discovery process may take more than a minute.
Power button for four seconds. After waiting a few seconds, turn it back ON. Please keep the Probe Configuration Tool application open and connected during the reboot process as the probe discovery process may take more than a minute. - If prompted, enter or confirm the Serial Number of the RTU, and click on OK. Normally, it should populate automatically.
1.3 Configuring the RTU's Management IP Address
The Probe Setting section displays the current IP addresses assigned to the RTU's Ethernet management port (on the back), including its local IP, Subnet, Gateway and DNS servers. For brand-new units, the factory default values are displayed on their respective fields.
Enter the static IP values assigned by the local IT, network administrator or VeSion manager, for the RTU being configured.

For NETWORK SECURITY reasons, the use of unprotected public IP addresses for the RTU's management port (Local IP) is not recommended! Damages and downtime related to hacking, malware, attacks, infections, etc., are not covered by the product's warranty.
Do not click on the Apply button yet. Configure the Operating Mode first.
2. Setting the RTU-300+ Operating Mode
The RTU can operate in two main architectural modes:
- Standalone/SCPI - The RTU300+ will behave as an individual instrument (local or remote), which can be controlled by single or multiple users. This self-contained solution offers a common graphical user interface (GUI) and multi-user access. Users connect to and control individual RTUs. Standalone can also be configured to support independent multi-test and concurrent multi-user GUI for individual access and control for individual RTUs. (Independent multi-user functionality is not available in older RTU-300.) In this mode, individual RTUs are operated using standard web browser, VNC client or EZ-Remote™ cloud service.
- VeSion - An Ethernet oriented test mode for multiple test heads distributed across the network footprint. This proactive network monitoring and testing mode offers centralized management, control, automation, data collection, analytics, dashboards, etc. It requires a VeSion® system, servers/cloud, main license, user licenses, RTUs, etc. This section focuses only on the RTU-specific settings required to establish a connection with the VeSion system, so VeSion administrator(s) can take control of the RTU and integrate it into the company's operational org chart and processes.
Note: Certain test modules may not support the VeSion operating mode. However, keep an eye on new software releases, as the functionality may be added in the future.
2.1 Configuring the RTU for Standalone Operation
After configuring all the required RTU IP addresses, set the Operating Mode to Standalone/SCPI.
Click on Apply. The RTU will reboot.
Once the RTU comes back ON, wait until the ![]() power indication is solid green and it finishes the bootup process.
power indication is solid green and it finishes the bootup process.
Using a Cat5 UTP network cable, connect the RTU's Ethernet port to the LAN.
Launch a web browser from a computer, tablet or smartphone, and point it to the IP address assigned to the RTU.
Follow the extra settings and operational instructions described in the Initial RTU-300+/300 Configuration (Quick Start Guide)
2.2 Configuring the RTU as a VeSion® Probe
In summary, VeSion is a centralized, distributed or cloud system that uses a server (group of servers or cloud) to control multiple geographically dispersed test heads (and portable field test equipment), gather results, correlate data and build a comprehensive view of the health of the network and services. RTUs can be used to run tests on demand (triggered by events or job orders) or to proactively monitor the health of links (scheduled tests), etc. VeSion mode focuses on testing modern Ethernet & IP interconnect, metro, edge and access network fabrics, as well as assisting in Quality of Service (QoS) and Experience (QoE) verification for high-speed Internet access services.
Multiple RTU-300+ can be integrated to and controlled by the VeSion centralized test, monitoring, workflow and data management system. This requires a VeSion system, servers/cloud, main license, user licenses, registered RTUs, etc. This section focuses only on the RTU-specific settings required to establish a connection with the VeSion system, so VeSion administrator(s) can take control of the RTU and integrate it into the company's operational Organization chart and its processes.
After configuring all the required RTU IP addresses, set the Operating Mode to VeSion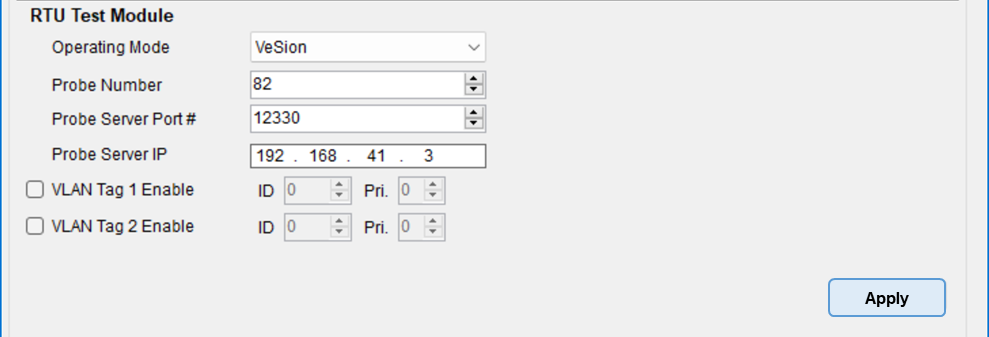
- Probe Number: Enter the remote probe identification number assigned by the VeSion system administrator, for this particular RTU.
- Probe Server Port: The TCP port number used to establish communication with the VeSion server. Unless instructed otherwise, use 12330 for RTU-300+ or 12320 for older RTU-300.
- Probe Server IP: Enter the IP address of the VeSion server to which this RTU has been assigned to.
- VLAN Tags: If required, up to two VLAN tags can be added. Use the checkboxes to enable.
- VLAN ID - Specifies the VLAN to which the frames belong. It is a 12-bit field with values between 0 and 4095 (0x000 and 0xFFF).
- VLAN Priority Point Code (PCP) - Refers to the IEEE 802.1p Class of Service (CoS) which indicates the frame priority level. Different PCP values can be used to prioritize different classes of traffic.
Click on Apply. The RTU will reboot.
Once the RTU comes back ON, wait until the ![]() power indication is solid green and let the RTU finish its bootup process.
power indication is solid green and let the RTU finish its bootup process.
Using a Cat5 UTP network cable, connect its Ethernet port to the LAN.
You may point a web browser to the IP address assigned to the RTU, to confirm it is online and to modify or set some extra parameters.
Contact the VeSion administrator or supervisor, to let them know that the RTU is online.
Follow the extra settings and operational instructions described in the Introduction to RTU-300+ VeSion Mode (Quick Guide)
3. Updating the RTU Software
While local software updates through the Console (RS232A) serial port are not recommended, this can be useful for a rare case in which other Ethernet or USB based methods may had failed.
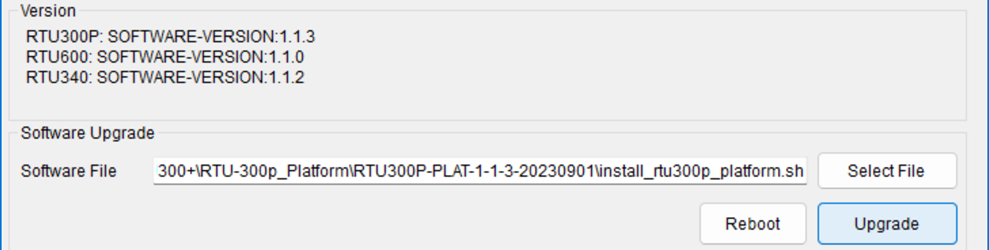
Compare the RTU300P (platform) and test modules (e.g., RTU340, RTU600) Versions reported by the RTU with the versions available in the RESOURCES sections of the RTU-300+ platform and modules' product web pages or from the Software Update web page.
If newer software releases are available:
- Download the platform and applicable module(s) installer packages and unzip them.
- Use the Select File button to load the install_rtu300p_platform.sh package file first, then click on Upgrade. The installer package will be uploaded into the RTU, then it will reboot to start the installation process. It will reboot again when finished. The process will take a few minutes.
- Once the platform has been updated, repeat the process for each of the modules' installer packages.
4. Operating the RTU-300+
Once the basic network configuration and operation mode have been finished, and IP connectivity verified:
- If configured as a VeSion probe, notify the VeSion administrator or refer to the
- For Standalone mode, refer to the extra settings and operational instructions in the Initial RTU-300+/300 Configuration (Quick Start Guide)