
Too Many OTDR Traces to Analyze? Need Help?
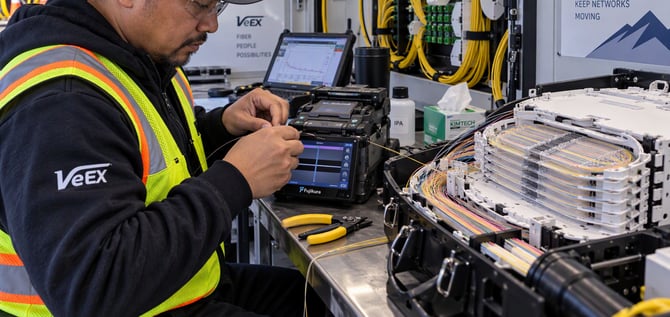
Manually analyzing and editing large volumes of bidirectional OTDR test results using PC-based post-processing software, such as Fiberizer® Desktop Plus for Windows®, can be very labor-intensive (e.g., data center interconnect trunks).
Earlier long-haul transport cable reels typically held 6 km of loose-tubes with up to 144 fiber strands. Today’s 2 km trunk cable reels use ribbon construction and commonly contain 3,456 or 6,912 strands, with manufacturers considering counts as high as 13,824. These higher fiber counts substantially increase the volume of test results requiring analysis and review, to levels that are not humanly possible. At least not in a timely or efficient manner. Besides the pressure from the customer to deliver results, the contractors also want to bill and get paid sooner.
Before multi-wavelength and/or bidirectional event analysis and reporting can proceed, several factors affecting Tier 2 test results must be addressed:
- Identical test parameters - Common settings are recommended for testing all the fibers in the same trunk cable. When mismatched pulse widths or sampling resolutions are used in testing, closely spaced events can result in merged/hidden events or length differences. Avoid the use of Auto Mode, since changes in OTDR test parameters (settings or configuration) may lead to different results, with inconsistencies such as different end reflections.
- Missing events – Calculating bidirectional average event loss requires the same physical event to be identified in both test directions. Low-loss events or events involving a mode field diameter (MFD) mismatch may go undetected in one or both directions on some fibers, preventing calculation of the bidirectional average loss for those events.
- Start/End Alignment – If the traces do not properly align, this can affect event averaging. For example, try using the same launch reel for testing from both ends and have them configured correctly in the OTDR settings.
-
Helix factor – Fiber strands within a trunk cable may differ in length because their helical paths vary, with outer fiber groups typically following longer paths. Although manufacturers may not specify the helix factor, fibers in a 3,456-strand trunk cable can be 3~6% longer than the cable jacket’s linear length. When 2 km cable reels are spliced together to build longer trunks, these length differences may cause the same physical splice location to appear at different distances on OTDR traces from different fiber strands, with offsets as high as 120 meters.
The TraceWise™ Expert Solution from VeEX
TraceWise is an integrated multi-fiber OTDR trace (SOR) analysis feature available in VeEX Fiberizer Desktop Plus starting with version 1.3.14. Designed to automate the batch analysis and interpretation of OTDR traces, it streamlines post-processing for trunk and data center interconnect (DCI) testing by processing up to 2,000 traces at a time and eliminating the need to manually review and edit each set of traces to make sure no event has been missed.
Note that each wavelength tested has its own SOR files, so if you performed tests with 1310 and 1550 nm then you can upload a set of traces for up to 1000 fibers at a time (2000 SOR files).
Note that each wavelength has its own SOR files, so if you performed tests with 1310 and 1550 nm then you can upload 1000 fibers at a time.
TraceWise analyzes multiple fiber traces from a cable and uses statistics and machine learning to identify events that may have been missing as well as adjust the alignment of common events, to generate a shared reference event template. Users can also use its multi-trace view to visually review ambiguous events and apply consistent event identification across all selected traces. This automated batch post-processing is intended to significantly reduce time, while improving the consistency and efficiency of optical fiber measurement analysis and reporting, particularly when processing large number of fibers within the same optical trunk or DCI cable.
How to Use TraceWise
Installing Fiberizer Desktop Plus for Windows
 Visit the Resources section on VeEX's Fiberizer Desktop Plus product page to download the latest version for Windows. Unzip it and launch the installer package. Make sure to give it the necessary files access permissions. Once finished, look for the application icon on your desktop.
If you are new to VeEX's Fiberizer® service, you must create a free Fiberizer Cloud account by selecting the Local pull-down menu on the top bar, select Sign in and Register. Once you have an account, please use the Contact Us form to request the activation of the basic TraceWise functionality for your account (include your User ID or email address and the type of OTDR you are using, in the comments). Versions of Fiberizer Desktop Plus and its TraceWise Expert functionality are currently available free of charge.
Once confirmed, you must use the menu in Fiberizer Desktop Plus to Sign in to Fiberizer Cloud (internet access required), in order to use the TraceWise functionality.
Once you become familiar with the TraceWise Expert feature, if you think the default values need some tuning for your applications, you may open the  Settings page, select
 TraceWise, and adjust the detection parameters as needed. You may also adjust the trace Analysis Thresholds in the OTDR section.
Loading High-Fiber-Count Traces into Fiberizer Desktop Plus
Launch the Fiberizer Desktop Plus application.
-
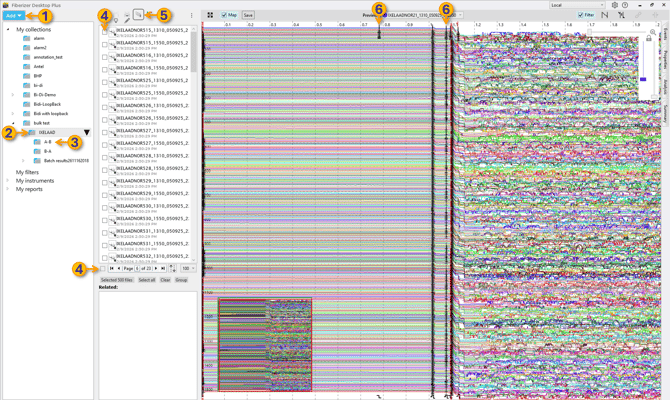
Click to open the Add
 menu, then on create Collection, to add a new folder for all the results related to the multi-strand cable you want to work on. Give it a descriptive name (e.g., using cable ID, customer name, sites, direction, etc.)
-
Select the newly created folder, click on its
pull-down menu icon, and select Add Collection. If you performed OTDR tests in both directions, create individual trace file folders for each direction (e.g., A-B and B-A). -
To add the OTDR SOR files (e.g., from a USB memory stick) to the desired sub-folder or collection, you can select them on the source, then drag and drop them directly to the desired sub-folder. You may also click on the sub-folder, click o its
pull-down menu icon, select Add Files, and use the File Manager to select the file sources to import. -
Click on a Collection sub-folder and, from the list in the middle, use the individual
 check boxes to select the individual OTDR traces that you want to process, or click on the global check box below the list to select them all. For the example above, we selected a total of 500 SOR files.
-
Select the
 Multi-Trace Overlay icon to display all selected traces on the same window (e.g., the A-B files). Use this view for an overall initial visual trace comparison, and to identify inconsistencies in the events detected across all fiber strands. All fibers following the same point-to-point trunk cable route should generally share the same physical events locations. However, some splices may have such low loss that the regular analysis may not detect them consistently on every fiber. Look for significant discrepancies that require further troubleshooting and investigation.
-
In the example above, we can see certain inconsistencies in the detection of event #3 and some 'spurious' events on the first few traces. However, there are no major issues like high losses or wrong end of fiber (EOF) detection events.
Performing the TraceWise Analysis
-
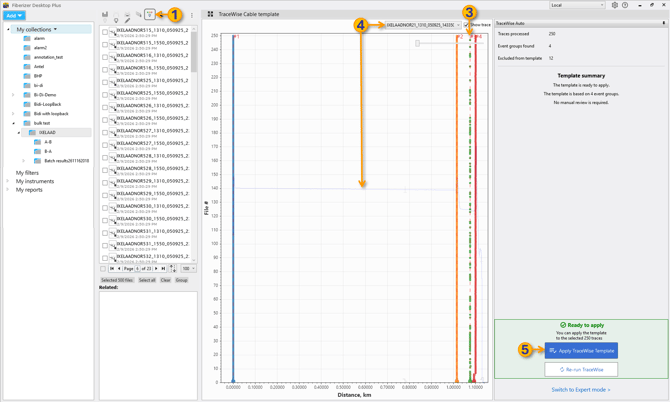
If no major discrepancies were found in the visual inspection (e.g., no shorter/broken strands), select the
TraceWise icon to start the smart analysis of all common events. -
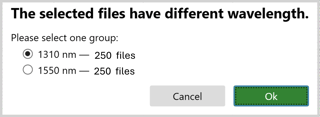
TraceWise detects if results are available for different wavelengths. Select the desired Wavelength for the SOR files to be analyzed and processed, then click on OK. You can later come back and process the other OTDR trace files.
-
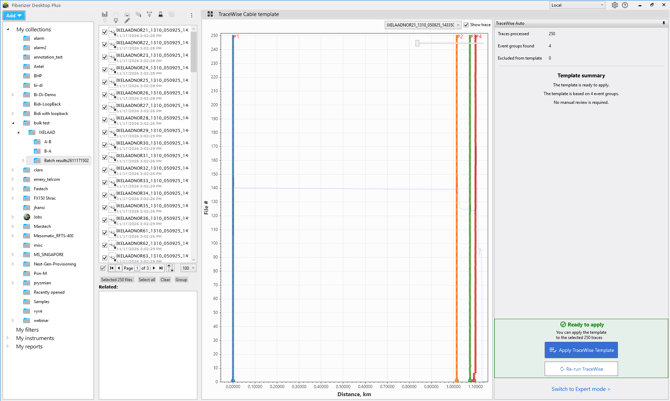
A summary of all the events found on the 250 traces are stacked for easier comparison and it is clear that event #3 was detected inconsistently. For example, depending on OTDR configuration, sometimes good splices may be missed.
-
Users can also select any of the traces from the pull-down menu and use it as a reference to get an idea of the types of events. You may try different strands to compare between detected and missed.
-
When ready, use the Apply TraceWise Template to correct the events detection in all traces
Applying TraceWise to Test Results
After clicking on the Apply TraceWise Template, a new harmonized Batch Results collection folder is created by TraceWise, with all events consistently identified. You can notice that event #3 has now been detected and added to all traces. Use the SOR files in the Batch Results folders to submit your job report.
You must repeat the process for each of the wavelengths (e.g., 1310 and 1550 nm) and directions (e.g. A-B and B-A) tested.
If you processed A-to-B and B-to-A traces, you should be ready to create bidirectional relationships and generate the Bidirectional Test Report for this cable.
Frequently Asked Questions
Is TraceWise Compatible with SOR Files from Other OTDR Vendors?
TraceWise may work with SOR files from other OTDR vendors, but compatibility and proper operation cannot be guaranteed or recommended. Although the Standard OTDR Record (SOR) file format is defined in Bellcore/Telcordia SR-4731, vendors may customize them by including additional data to support newer features not covered by the original standard definition. These vendor-specific extensions may affect compatibility. In certain cases, reanalyzing the traces with Fiberizer Desktop or Cloud, may help improve compatibility of third-party SOR files.
TraceWise is optimized for SOR traces generated by VeEX OTDRs, which we recommend using.
Can SOR Files Come From Different OTDRs?
Measurement consistency is very important in these repetitive tests. If more than one OTDR is used to perform the verification or validation tests, it is recommended that they all have the same performance specs and use the same settings, so all the tests can be considered to be performed under the same (or very similar) conditions.