Summary
The USB IP configuration process allows an MPA processor to automatically update its network settings using a properly configured mpa_ipconfig file stored in the root directory of a USB flash drive.
By connecting a USB flash drive containing the mpa_ipconfig configuration file to the MPA processor card (either an SCM-210 or AM4022, depending on the system configuration), the processor will automatically update its network settings using the values specified in the file.
Important
-
The instructions in this document apply specifically to VeEX MPA systems.
-
This procedure is supported only on MPA systems running Feature Set Version 7.5.20 or later.
MPA Chassis Processor Generations
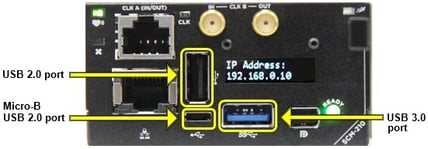
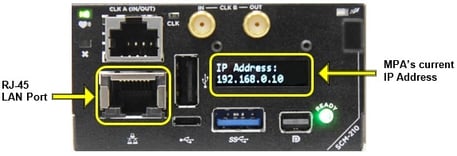
SCM-210 (3rd Gen MPA Chassis - 6 card slots)
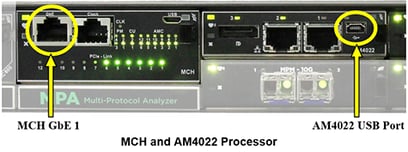
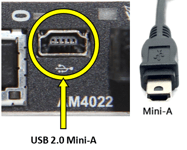
AM4022 in top-left slot (2nd Gen MPA Chassis - 5 card slots)
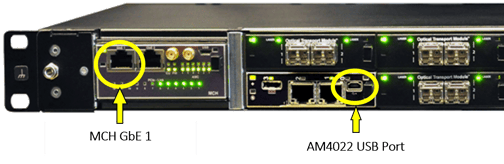
AM4022 in bottom-left slot (1st Gen MPA Chassis - 5 card slots)
Hardware Requirements
- Standard USB flash drive with at least 20 KB of available space
- A USB flash drive containing the mpa_ipconfig file and user documentation is included with each MPA system.
- Windows PC with a text editor (i.e., Notepad, Notepad++, or WordPad)
 WordPad generally displays the configuration file in a more readable format than Notepad.
- USB 2.0 Mini-A cable (required only for systems using an AM4022 processor)
- MPA systems equipped with an AM4022 processor are shipped with:
- One USB 2.0 Mini-A cable for the AM4022 processor
- One USB 2.0 Micro-B cable for the MCH card
- MPA systems equipped with an AM4022 processor are shipped with:
Software Requirements
mpa_ipconfig Configuration File:
-
The mpa_ipconfig file is an editable text file with no file extension.
-
This file can be downloaded and extracted from the following Zip file:
-
After downloading, extract the mpa_ipconfig file from the ZIP archive before editing it.
Procedure
Please read the following instructions before implementing this procedure.
1. Edit the mpa_ipconfig File
The mpa_ipconfig file must be edited with a text editor and saved to the root directory of the USB flash drive.
Important:
- The file is a text file but does not use a Windows file extension.
- Do not rename the file.
- Do not add a file extension such as .txt.
- If you downloaded the ZIP file, extract the mpa_ipconfig file before editing it.
2. Configure a Static IP Address
To assign a static IP address, modify the mpa_ipconfig file with the appropriate network settings:
# MPA IP address configuration file.
IPADDR=192.168.0.10
NETMASK=255.255.255.0
GATEWAY=192.168.0.1
DNS1=8.8.8.8
DNS2=8.8.4.4
Notes
- Ensure each line ends with a standard carriage return and line feed (CR/LF).
- The IP range 192.168.138.0 to 192.168.138.255 is reserved and must not be used.
 Assigning an address within this range may cause a serious system conflict.
- If using an address in the 192.168.x.y range (where x ≠ 138), the subnet mask must be 255.255.255.0.
- The default DNS servers (8.8.8.8 and 8.8.4.4) are Google's public DNS servers.
 These values only need to be changed if your network uses different DNS servers.
3. Configure DHCP
To assign a static IP address, ensure the processor is connected to a network with an active DHCP server or router, and modify the mpa_ipconfig file as follows:
# MPA IP address configuration file.
IPADDR=DHCP
Notes
- When
IPADDR=DHCPis specified, all other address settings in the file are ignored.
4. Copy the Configuration File to the USB Drive
Copy the updated mpa_ipconfig file to the root directory of the USB flash drive if it is not already present.
5. Verify the MPA Has Fully Booted
Before inserting the USB flash drive:
- Ensure the MPA has been powered on for at least 4 to 5 minutes.
- Verify one of the following:
- The SCM-210 READY LED is solid green.
- The AM4022 status LED (upper-left corner of the processor) is solid green.
6. Close Remote Connections
Close all active remote connections to the MPA, including Remote GUI, WebUI, VNC, SCPI, and/or Python.
7. Connect the USB Flash Drive
Insert the configured USB flash drive into the processor card.
AM4022 Systems:
-
-
Connect the USB flash drive to the AM4022 USB port using the supplied USB Mini-A adapter cable.
-
SCM-210 Systems:
-
-
Connect the USB flash drive to any of the three available SCM-210 USB ports.
-
The three USB ports provided on the SCM-210 card include a standard USB 2.0 port, a standard USB 3.0 port, and a Micro-B USB 2.0 port (which requires a USB Micro-B adaptor cable).
-
Refer to the chassis processor images above for USB port locations.
-
8. Allow the System to Process the Configuration
Within approximately 30 seconds, the processor will automatically read the mpa_ipconfig file, apply the configured network settings, and reboot the MPA system.
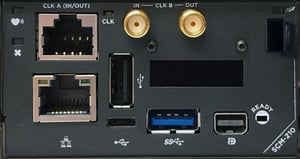
SCM-210 Reboot Indicators
- During reboot, the OLED display temporarily goes blank, and the green READY LED turns off.
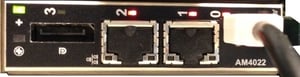
AM4022 Reboot Indicators
-
During reboot, the LEDs above the Ethernet, USB, and Display ports (labeled 0-3) briefly illuminate red, and after a few seconds, the LEDs return to green or turn off.
 Note: If the system does not reboot within 30 to 45 seconds of inserting the USB drive, check the following conditions:
- The configured IP address may already match the current processor IP address.
- The mpa_ipconfig file may have been renamed.
- A file extension may have been added to the file.
- The file may have been saved in a subfolder instead of the USB drive's root directory.
- The USB flash drive may not have been recognized. Remove and reinsert it.
- The MPA may not have completed booting before the USB drive was connected. Wait several minutes and try again.
9. Remove the USB Flash Drive
Once the reboot process begins, remove the USB flash drive from the processor.
10. Verify Network Connectivity
Allow approximately 4 to 5 minutes for the MPA to complete its reboot sequence, then verify you can Ping the processor's new IP address, and connect to the MPA with the WebUI or VNC.
11. Confirm Operation on SCM-210 Systems
For systems equipped with an SCM-210 processor:
- The new IP address is displayed on the OLED screen.
- The system is fully operational when the green READY LED is illuminated.