
Whether you are adding a new High Precision GNSS Receiver module to an existing TX300S, RXT-1200 or MTTplus test platform, or replacing an old GPS Receiver module, you must follow the instructions in this guide.
For new installations, make sure you the GNSS/GPS license has been activated (via license key or VeExpress™). Perform any required software updates to the platform and modules before you start.
1. Removing Existing GNSS/GPS Module
If upgrading from (replacing) an older GPS to a newer GNSS receiver card (e.g., multi-band, multi-constellation) or replacing a damaged one:
- Turn the test set OFF.
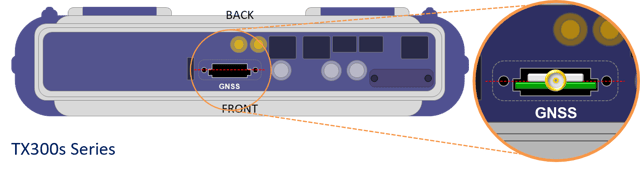
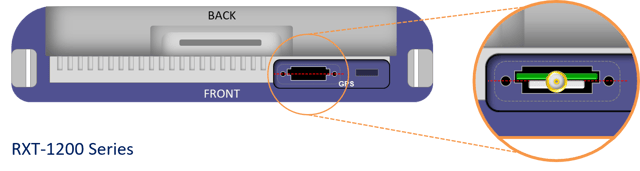
- Use a pencil, tape or sticker to mark the GNSS/GPS plastic cap on the front-facing side (facing the screen), in order to identify its proper orientation later on (DO NOT reverse it). This is very important as it MUST be reinstalled in the same orientation. The examples below are for the TX300S and RXT-1200.
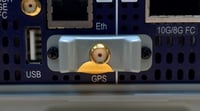
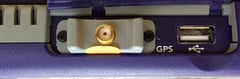
- Use a magnetized screwdriver to remove the two screws that secure the plastic cover to the panel. DO NOT let screws (or any other foreign material) fall into the test set!
- Note that the plastic cover may adhere to the panel, so use gentle pressure to release it without causing any damage to the card.
- Hold the card from its SMA connector and pull to extract the old GNSS/GPS Receiver module. Make note of the main chip position, because the new card must be inserted with the same orientation.
2. Installing a New GNSS Receiver Module
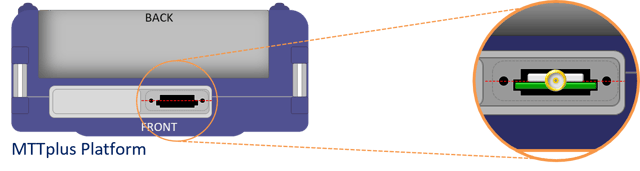
Note that the GNSS/GPS slot is asymmetrical. The taller part of the slot indicates the orientation of the (large) shielded GNSS chip and the shorter one is for the PCB (board) side.
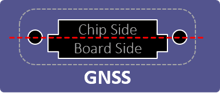

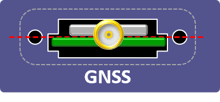
At the end, the center of the SMA connector must align with the two screw holes.

DO NOT try to force the GNSS card into the slot in any other orientation.
- If this is a new installation, use a magnetic screwdriver to remove the screws and metal plate covering the GNSS/GPS slot. DO NOT let screws (or any other foreign material) fall into the test set!
- Carefully insert the new GNSS Receiver module into the slot, following the orientation of the metal-shielded chip, as shown in the diagrams below. Inserting the module incorrectly may cause permanent damage to the card or the test set.
- Replace the plastic cap, minding the original orientation. Make sure the offset notches (slots) inside the cap align with the module’s printed circuit board (PCB). The cap must lay flush with the connector panel surface (no rocking or gaps) and the screw holes must align perfectly with the ones on the panel, no adjustments or forcing should be necessary.

- Secure the plastic cap with the screws.
- Turn the test set ON.
- If this is a new installation, make sure to activate the GNSS/GPS license (software option)
- Connect the test set to the Internet, using LAN, Wi-Fi or tethered cellular connection, go to >Utilities >VeExpress and tap on the Check button to retrieve the newly assigned GNSS/GPS license and activate the option in the test set.
- If a Permanent License Key was requested, go to >Utilities >Settings >About >Software Options, find the GNSS/GPS option, tap on the
 Key button and enter the activation code you received via email.
Related Test Solutions
- TX300s Series - Test Sets
- RXT-1200 Series - Advanced Modular Test Platform
- MTTplus Series - Modular Test Platform