
The MTX150x Lite Test Set
The MTX150x-Lite test set is an easy-to-use high-speed Internet services installation, verification and maintenance test tool, up to 10 Gbit/s. It focuses on customer-oriented application-layer internet speed tests (HTTP, TCP/UDP and FTP) to verify Quality of Service (QoS) and assure Quality of Experience (QoE), up to 10 Gbit/s. The tests are performed, and results are presented, in a way that subscribers (IT and non-technical) can understand and accept as proof of performance in compliance to the applicable service expectations or service level agreement (SLA). If a service under test doesn't comply to the expected performance, the test set gives technician access to basic troubleshooting tools to diagnose problems.
Front View
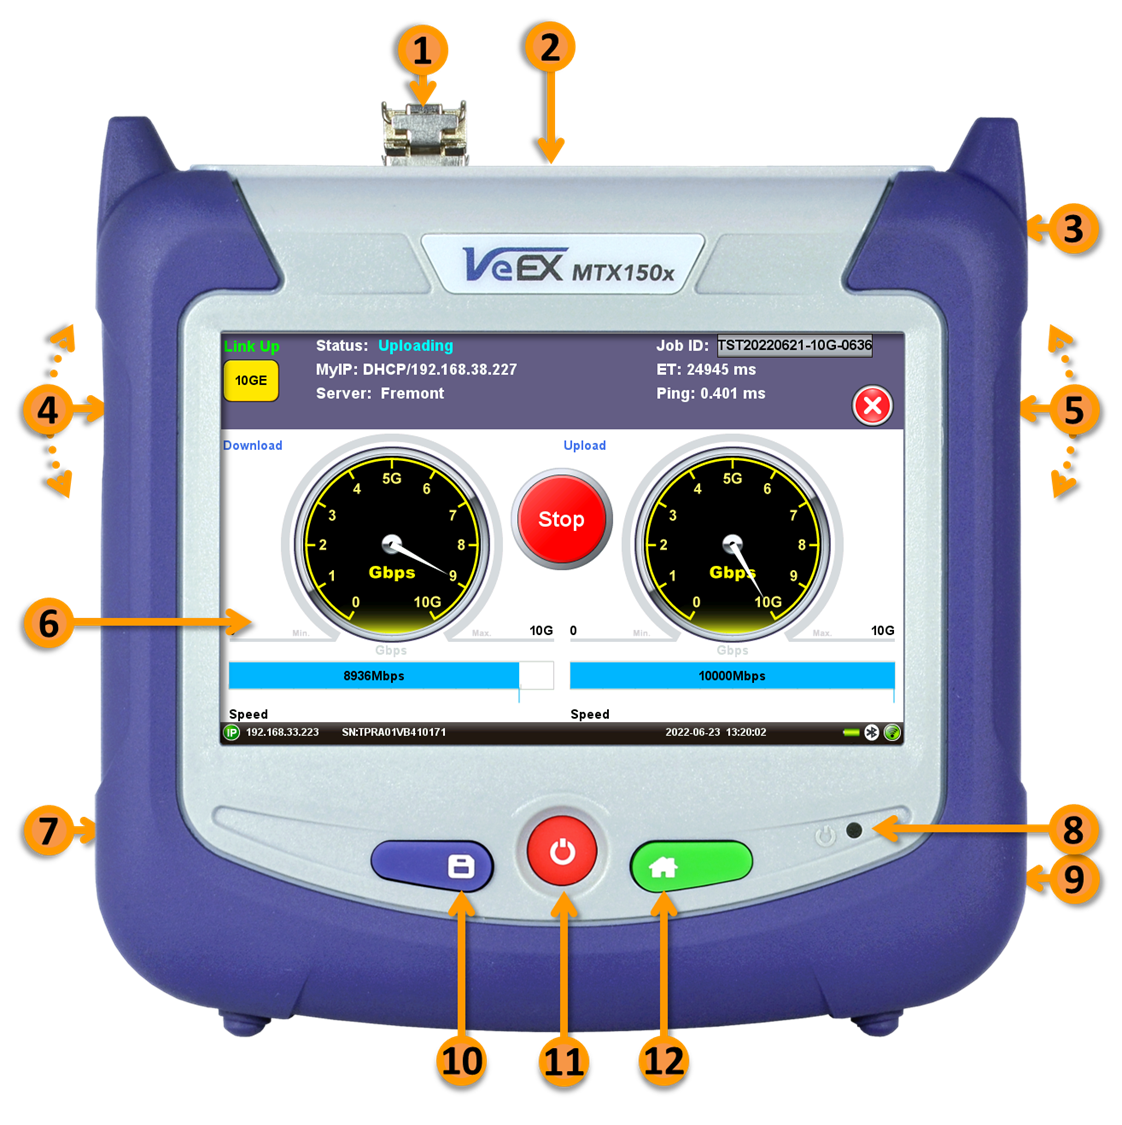
- Optical Test Port (SFP+): Slot for Ethernet 100BASE-FX and 1/10GBASE-X pluggable transceivers.
- UTP Test Port (RJ45): Ethernet 10/100/1000BASE-T, 2.5/5/10GBASE-T.
- Use certified Cat 6a or Cat 7 UTP test patch cords for line rates above 1 Gbit/s.
- Stylus (use when finer touch screen control is required).
- Left Rocker button. Its functionality depends on individual applications (e.g., push to expand left menu bar, scroll left/right, etc.).
- Right Rocker button. Its functionality depends on individual applications (e.g., push to expand right menu bar, scroll up/down, capture screenshots, etc.).
- Touch screen LCD.
- DC power socket (use VeEX-supplied AC/DC chargers only).
- Power Indication LED.
- Off - Power is OFF, not charging.
- Orange - Battery is charging/AC Charger plugged in.
- Green - Power is ON.
- Micro-B USB port. Use USB OTG adapters and cables for USB-A memory sticks, Ethernet adapters, Fiber Scope, Optical Power Meter, OTDR, etc.
- Save button (press to save current test results).
- Power ON/OFF button.
- Home button (press to return to main menu). Press and hold for about three seconds, to send the test set to sleep mode (no test running).
Connector Panel (top view)

Follow the guide below to start testing high-speed and multi-gigabit Internet access services.
1. Connect the Patch Cord
Use the appropriate copper RJ45 (UTP) or fiber duplex-LC test cord to establish a physical connection between the port or device under test (DUT) and the corresponding test port on the MTX150x Lite.

 Copper UTP: Use patch cords that are rated to support the port's maximum Ethernet speeds. Good quality Cat6a and Cat7 patch-cord cables are required for devices supporting 2.5GE (2.5GBASE-T), 5GE (5GBASE-T) and/or 10GE (10GBASE-T).
Warning: Using lower quality or non-certified for Cat6a or Cat7 cables will produce lower results, limit maximum data rate or fail to establish a connection.
 Fiber Optics: Make sure to clean all male and female connectors. Verify them using a digital Fiber Scope. (Cross-contamination build-up can degrade the test set's performance.) Insert the appropriate SFP+ transceiver into the test set's slot and make the connections.
 The optical transceiver's laser will automatically turn on, so it is ready to activate the link and run the tests. Although most common optical transceivers are considered safe, please follow standard eye safety procedures and common sense (e.g., avoid using old optical/glass scopes or looking directly at active connectors).
2. Turn the Test Set ON
 Press and hold the Power button for two seconds, until a confirmation tone (beep) is heard, and the VeEX logo appears on the screen, then release the power button.
The test set will take a few seconds to boot up, automatically start the RJ45 BASE-T V-TEST (VeEX Internet Speed Test) application, detect the link, auto-configure and get an IP address. Once ready, the GO button will be displayed, indicating that the test set is ready to test.
Note: To turn the test set OFF, press and hold the Power button until two confirmation tones (beeps) are heard.
 By default, the test set always starts in BASE-T copper mode (RJ45), as indicated by the Test Mode Selection button.
 To test fiber optics links, tap on the red (X) icon, then tap on the Test Mode button (bottom-left corner of the screen) to access the Layer4 Test Mode Selection menu, tap on the SFP+ button, check the box for 1GE (1000M Base-X) or 10GE, press OK and wait for the test application to load.
3. V-TEST Internet Access Speed Test
The V-TEST feature qualifies network TCP/HTTP protocol performance by testing against a V-TEST HTTP server. It tests Internet speeds up to full line rate, using Ookla's Speedtest.net, Netflix's Fast.com or Ubiquiti's WiFiman.com servers to verify the maximum download and upload data rates attainable by subscribers' high-speed or Gigabit Internet services. This test application is launched automatically after turning the test set ON.
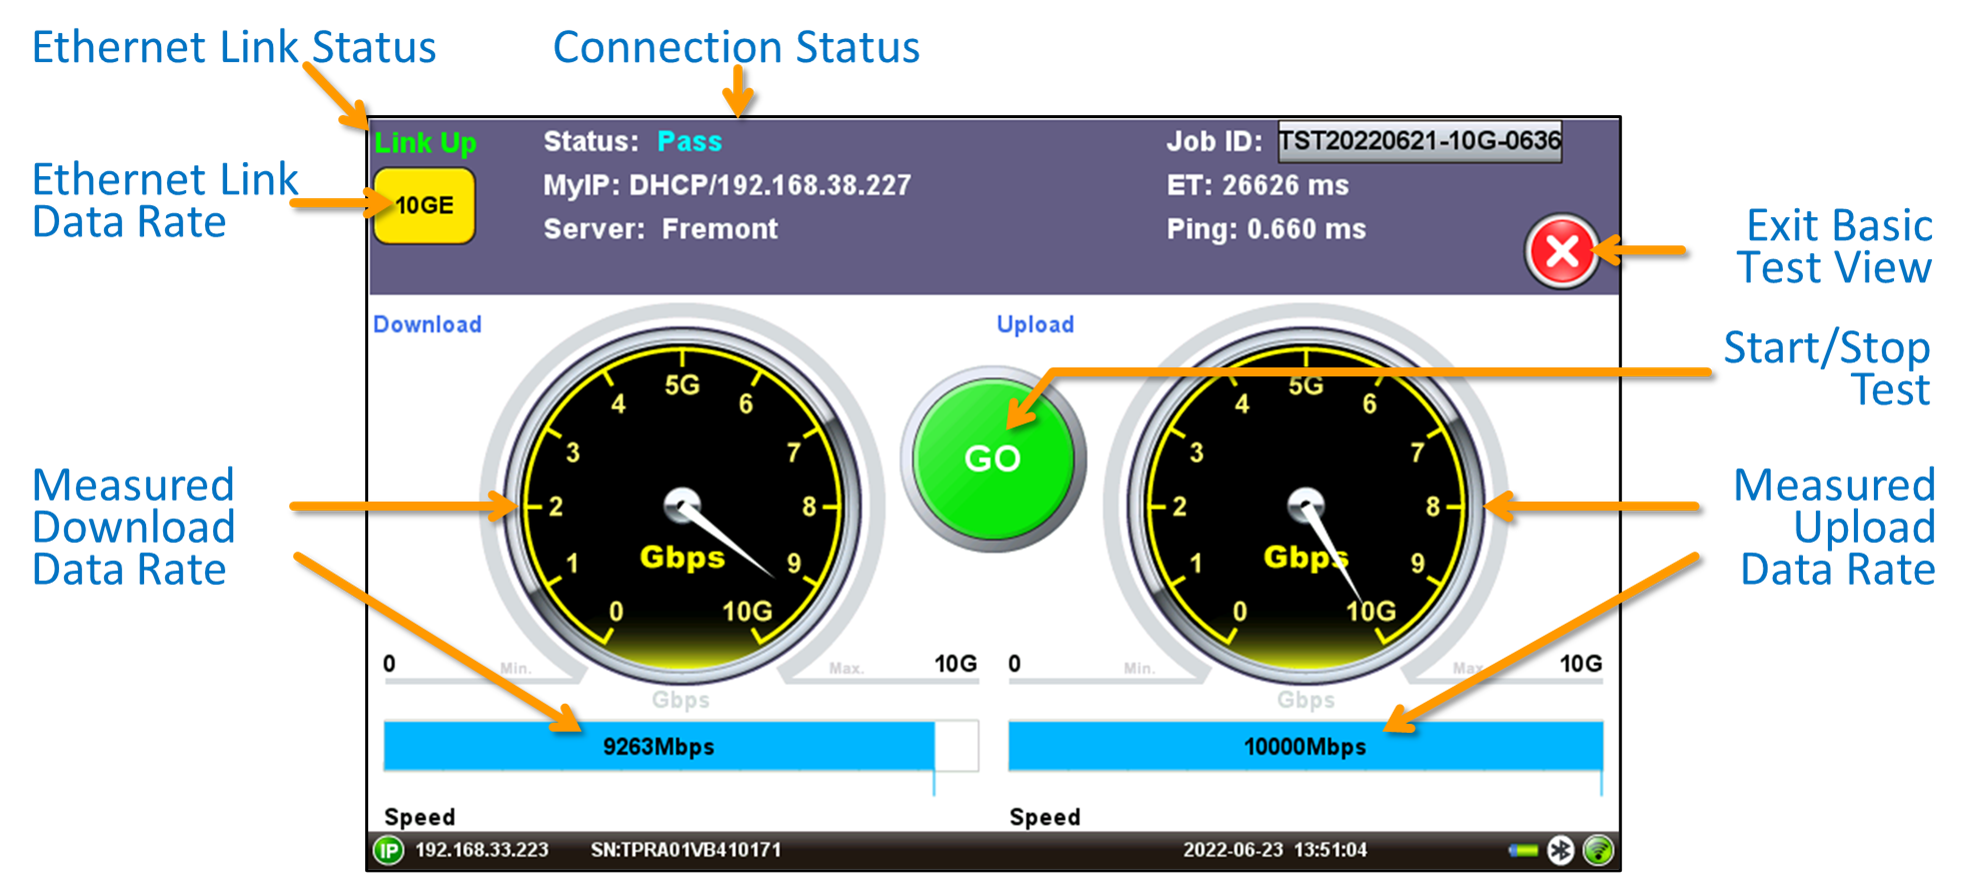
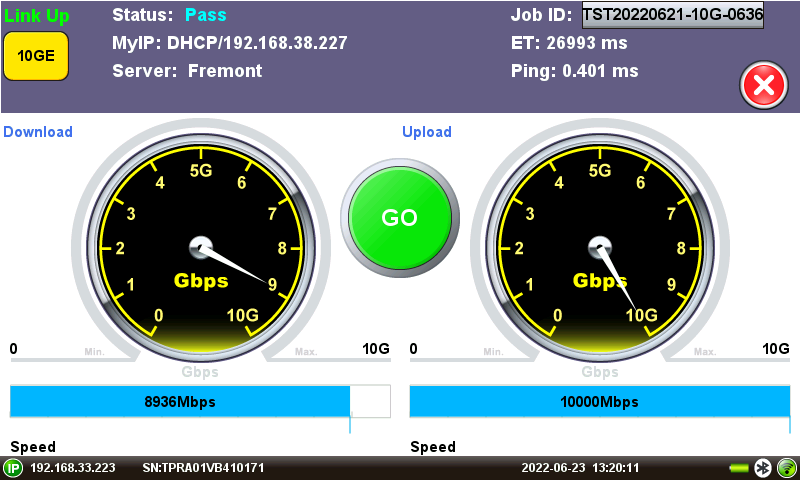
3.1 Basic V-TEST View
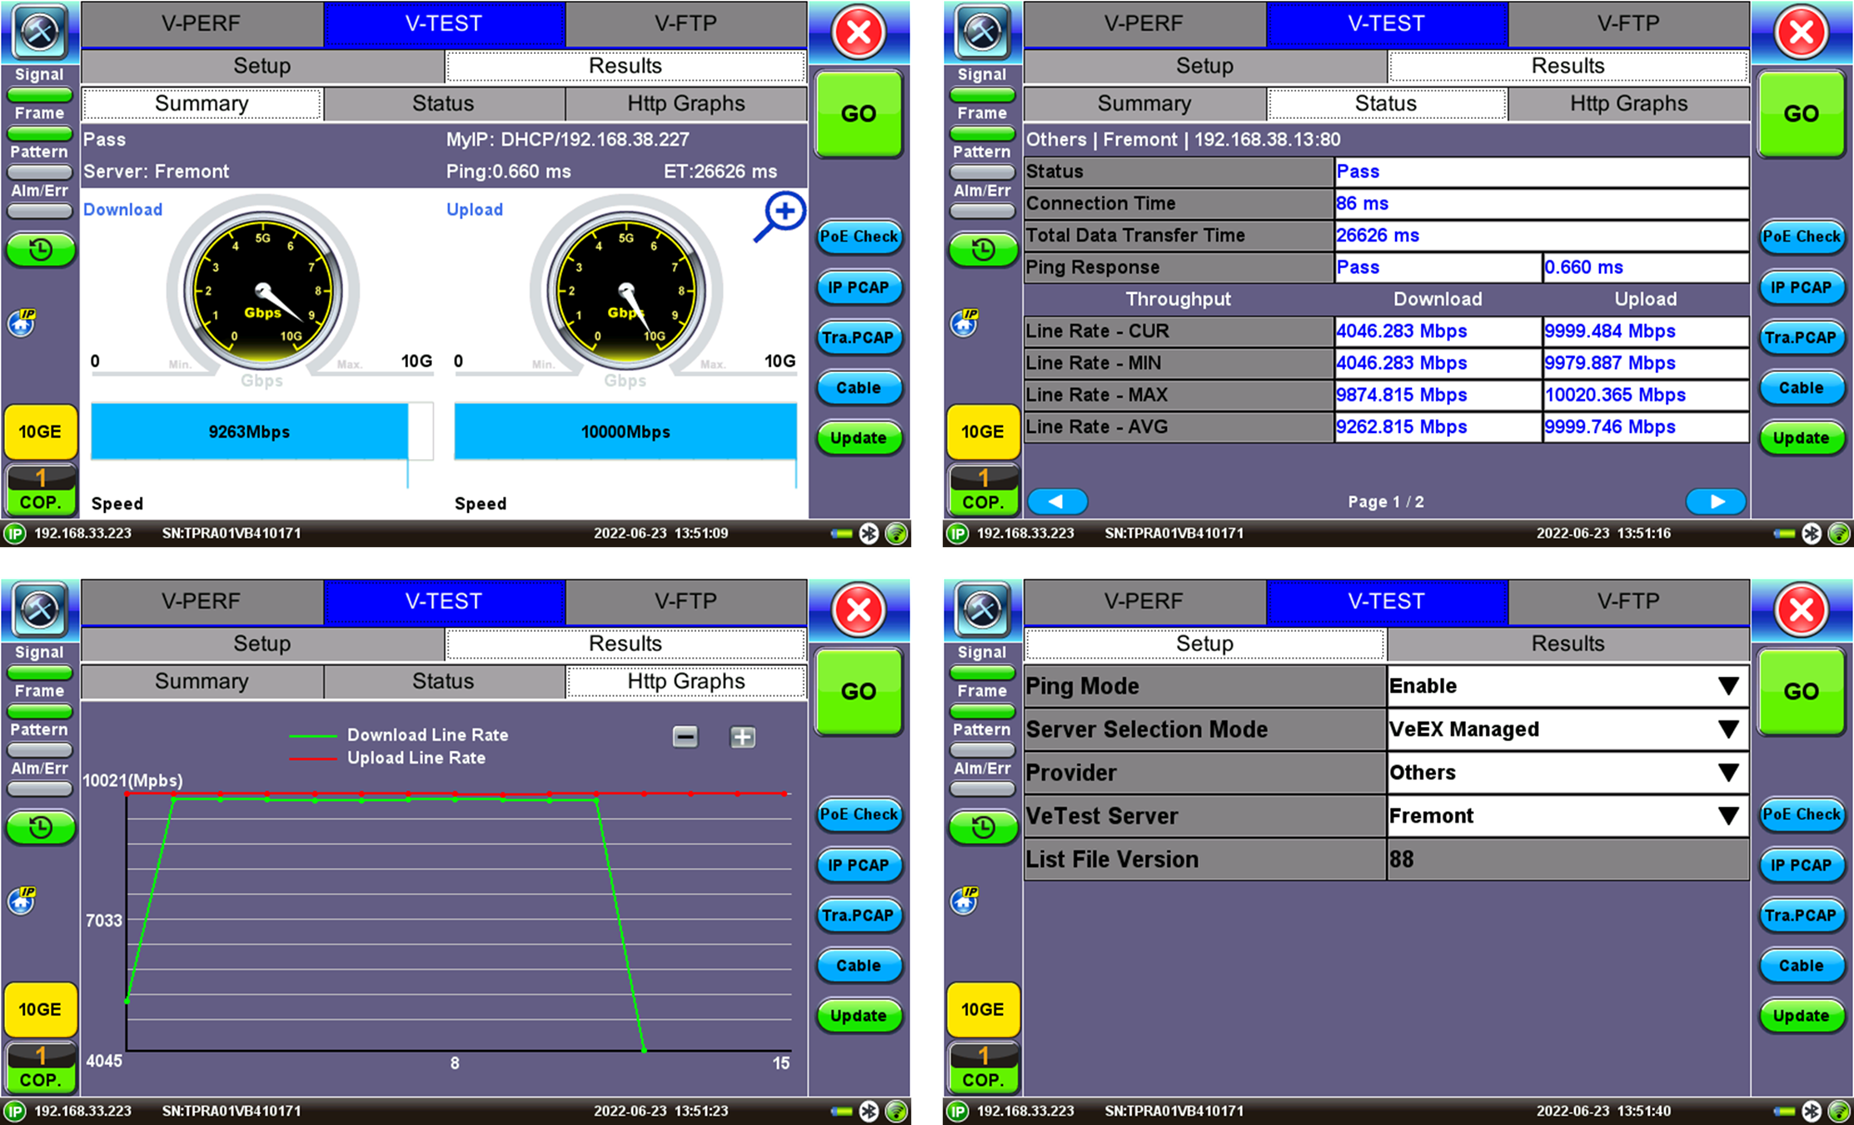
3.2 Full V-TEST Results View & Setup
Press the (X) icon to access more test details. The different tabs provide access to detailed test Results (Summary, Status, Graphs), Setup (manual configuration), and offers buttons for direct access to other related troubleshooting test tools. Tap on the blue magnifying glass icon to go back to the Basic V-TEST View.

Link Status Indicator Labels & Common Terms
A yellow status box will be displayed when the link has been properly established with the port under test and it is considered active.
10GE: 10 Gbit/s, 10GBASE-T copper interface (RJ45 UTP) or 10GBASE-X optical interface (LC-UPC duplex)
5GE: 5 Gbit/s, 5GBASE-T copper interface (RJ45 UTP) or 5GBASE-X optical interface (LC-UPC duplex)
2.5GE: 2.5 Gbit/s, 2.5GBASE-T copper interface (RJ45 UTP) or 2.5GBASE-X optical interface (LC-UPC duplex)
1GE: 1 Gbit/s, 1GBASE-T copper interface (RJ45 UTP) or 1GBASE-X optical interface (LC-UPC duplex)
1000T: 1 Gbit/s, 1000BASE-T copper interface (RJ45 UTP)
100T: 100 Mbit/s, 100BASE-T copper interface (RJ45 UTP)
10T: 10 Mbit/s, 10BASE-T copper interface (RJ45 UTP)
CAT: UTP cable Category (use Cat 6a or 7 for >1 Gbit/s)
COP: Copper interface (native RJ45 or copper SFP+ adapter)
FDX: Full Duplex
HDX: Half Duplex
PoE: Power over Ethernet
UTP: Unshielded Twisted (copper) Pairs cable
4. Start the Test
- Press the green GO button to start the Internet speed test.
- The test set identifies the internet service provider (ISP) and searches for the closest Ookla Speedtest® server, based on round-trip response times.
- Then it runs the Internet speed test for the Download direction (from server to test set), then the Upload (from test set to server) and displays the results.
- Once finished, the GO button will turn back to green. It is ready to save the results and/or run more tests.
IP Addresses
![]() MyIP (also known as 'Home IP') is the IP address assigned to the active Test Port and the one used for testing purposes. Tap on the icon to display the current IP address assigned to the active port.
MyIP (also known as 'Home IP') is the IP address assigned to the active Test Port and the one used for testing purposes. Tap on the icon to display the current IP address assigned to the active port.

The IP address displayed at the bottom-left corner of the screen is the test platform's management connection (WiFi or LAN) used by system's features, like remote control, software updates, etc. LAN connections require an optional micro-B USB to RJ45 Ethernet adapter cable.
5. Save the Results
 Press the SAVE button, use the touch-screen keypad to enter the name (overwrite or edit), and tap on Apply.
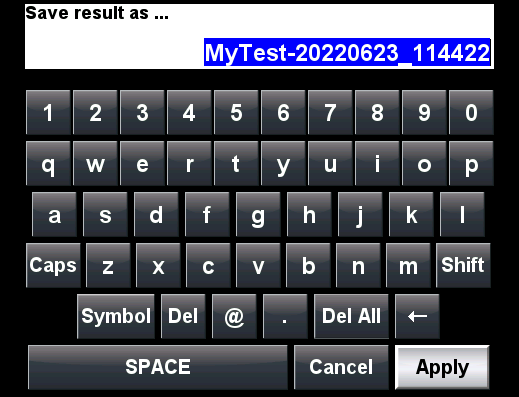
Auto-Naming: By default, the test set auto-naming feature uses the current date and time to generate a default unique name for every test result (YYYYMMDD_hhmmss). Users can overwrite the auto name or define a specific prefix to be added to it (e.g., to identify site, cabinet, rack, customer or the technician running the test). To configure the prefix, press the (X) icon, then the ![]() Tools icon, go to the System Utilities tab, select Global Setting, Storage Setting and enter the desired prefix in the File Name Prefix field (e.g., MyTest-). From then on, all tests would be auto-named MyTest-YYYYMMDD_hhmmss.
Tools icon, go to the System Utilities tab, select Global Setting, Storage Setting and enter the desired prefix in the File Name Prefix field (e.g., MyTest-). From then on, all tests would be auto-named MyTest-YYYYMMDD_hhmmss.
If the Advanced Saving option is turned ON, a secondary form is displayed to enter extra information about the Job ID/Work Order, technician, location, and comments. This would create more complete test reports and it is required if the test set is registered to the centralized R-Server workflow & results management system.
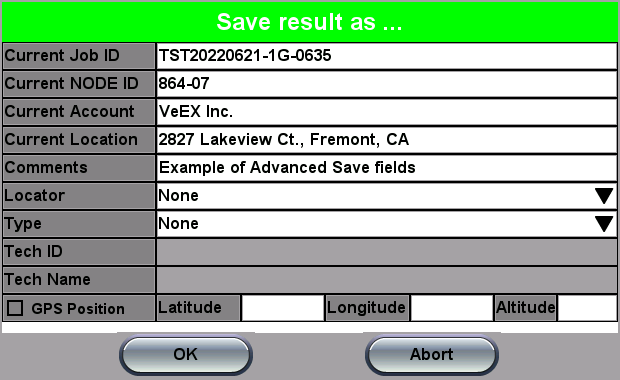
Advanced Saving: To append extra information to test reports, press the (X) icon, then the [Tools] icon, go to the System Utilities tab, select Global Settings, Storage Setting and turn the Advance Saving field to ON.
6. See Results & Generate Test Reports
To access the test results stored in the test set, press the (X) icon, then the [Tools] icon, go to the Results & Files tab, and select Saved to access the File Manager.
Select the desired file and press View to open the test report. To navigate the report, use the links in its Table of Content and the right rocker switch to scroll Up and Down.


View: Tapping on the desired row opens the selected test report (one report at a time).
![]() Close: Closes the current test report and goes back to the File Manager.
Close: Closes the current test report and goes back to the File Manager.
![]() Del.: Tap on this icon to Delete all unlocked test reports that are selected with checkmarks. This function is not allowed if grayed out (file locked).
Del.: Tap on this icon to Delete all unlocked test reports that are selected with checkmarks. This function is not allowed if grayed out (file locked).
![]() Rename: Tap on this icon to Rename the selected test report (one at a time). This function is not allowed if grayed out (file locked).
Rename: Tap on this icon to Rename the selected test report (one at a time). This function is not allowed if grayed out (file locked).
![]() /
/![]() U/L: Tap on this icon to Unlock or Lock test reports. Locked files and reports are identified by a closed red padlock icon. Locked test reports cannot be deleted or renamed.
U/L: Tap on this icon to Unlock or Lock test reports. Locked files and reports are identified by a closed red padlock icon. Locked test reports cannot be deleted or renamed.
![]() QR Code: Tap on this icon to generate a NoApp™ QR code containing the most relevant test results information. The resulting QR Code can be scanned with any connected smartphone or tablet to access the NoApp web application and display the test results. Not all test reports can be transferred via QR code.
QR Code: Tap on this icon to generate a NoApp™ QR code containing the most relevant test results information. The resulting QR Code can be scanned with any connected smartphone or tablet to access the NoApp web application and display the test results. Not all test reports can be transferred via QR code.
![]() PDF: Generates a simple PDF copy of the test report and stores it in an attached USB memory stick (required) for distribution (e.g., via email).
PDF: Generates a simple PDF copy of the test report and stores it in an attached USB memory stick (required) for distribution (e.g., via email).
![]() To USB: Exports (backup) all selected test results, test profiles and screenshots stored to an attached USB Memory Stick. The included On-The-Go (OTG) micro-B USB to USB-A adapter cable is required for traditional USB memory sticks.
To USB: Exports (backup) all selected test results, test profiles and screenshots stored to an attached USB Memory Stick. The included On-The-Go (OTG) micro-B USB to USB-A adapter cable is required for traditional USB memory sticks.
![]() From USB: Imports (restores) all test results, test profiles and screenshots stored in an attached USB Memory Stick. The included On-The-Go (OTG) micro-B USB to USB-A adapter cable is required for traditional USB memory sticks.
From USB: Imports (restores) all test results, test profiles and screenshots stored in an attached USB Memory Stick. The included On-The-Go (OTG) micro-B USB to USB-A adapter cable is required for traditional USB memory sticks.
![]() To BT: Transfers selected test results, test profiles and screenshot files to a paired Bluetooth® smartphone, tablet or PC. (Pairing procedure varies by computing device and operational system.)
To BT: Transfers selected test results, test profiles and screenshot files to a paired Bluetooth® smartphone, tablet or PC. (Pairing procedure varies by computing device and operational system.)
![]() User Files: Tap this icon to view, access and manage test-related files stored in the test set.
User Files: Tap this icon to view, access and manage test-related files stored in the test set.
![]() Browse USB: Tap on this icon to browse the content of an attached USB memory stick. Certain files, like PCAP and Wander, may be opened from this file tree.
Browse USB: Tap on this icon to browse the content of an attached USB memory stick. Certain files, like PCAP and Wander, may be opened from this file tree.
![]() Storage Info: Displays the storage capacity information for the internal user storage.
Storage Info: Displays the storage capacity information for the internal user storage.
![]()
![]() Page X/Y: Use the page buttons to navigate through longer lists of test results, test profiles and screen shots. X is the current page being displayed and Y is the total number of pages available.
Page X/Y: Use the page buttons to navigate through longer lists of test results, test profiles and screen shots. X is the current page being displayed and Y is the total number of pages available.
7. Changing Test Modes (Copper ↔ Fiber)
By default, the test set starts in copper (RJ45) mode and can automatically detect 10GBASE-T, 5GBASE-T, 2.5GBASE-T, 1000BASE-T and even legacy 10/100BASE-T. Users may manually change it to any of the two fiber optics test modes, 1GBASE-X and 10GBASE-X, by following the steps depicted below.

- Tap on the
 icon to go to the full view mode.
 - Tap on the Test Mode Selection button shown on the bottom-left corner of the screen,
- On the Layer4 Test Mode Selection menu, select the desired test port type: SFP+ (for fiber optics interfaces) or RJ45 (for copper interfaces).
- Depending on the selected test port type, check the box for the appropriate test mode: 1000M Base-X (1GE), 10GE, or 1000M/2.5G/5G/10G Base-T.
- Press OK and wait for the new test application to launch.
- Connect the test cable between the test set and the device under test, make sure the laser is ON
 , select Speed Test from the menu, and follow a similar testing procedure as described earlier.
8. Advanced V-TEST Modes
8.1 Speed Test Server Selection Modes
Auto – This is the default and recommended server selection for the Ookla® Speedtest® powered mode. It automatically selects the best speedtest.net server from lists maintained by Ookla.
Manual – Users can manually select a specific Server ID from a list of public Ookla servers.
8.2 Speed Test Modes
Ookla Speedtest – This is the default mode, and it is also known as "Speedtest Powered" mode. It performs internet speed tests by selecting the host from public lists of speedtest.net servers, maintained by Ookla, its partners and/or its customers. the test follows Ookla’s methodology and tests to the Speedtest® Server Network. In this mode, the test is compatible with Ookla’s protocol/methodology; it will scan nearby servers in the local market and test to the server with the fastest (lowest latency) response.
VeEX Managed – Perform internet speed tests by manually selecting servers from lists created and maintained by VeEX. These non-public lists are created with specific customers in mind and can be updated by connecting the test set to the Internet and pressing the Update button. In VeEX Managed mode, the customer’s servers are added to a customer server list that is maintained and managed by VeEX for the end-user’s ease of use and convenience. The full list of server IP addresses or URLs must be provided to VeEX. Once added, all the users have to do is to select the server from their company's list and initiate the test to the selected server.
User Managed – Advanced users can perform internet speed tests by manually selecting servers from lists manually created by the user, using the Manual mode. In User Managed mode, the user is allowed to enter the server IP/URL and save it to a server list that they can maintain and manage on their own.
Manual – Advanced users, with detailed knowledge of their Speedtest servers, can manually add their own servers, test files and maintain their own server lists.
8.3 ISP & Sponsored Server Selection Modes
V-TEST or Speedtest® verify/certify the Internet Access data rates. Which are the rates advertised by the Internet (access) Service Provider (ISP), from the customer's premises to the point of entry to the Internet. For that reason, the selection of the centralized speed test server is very important.
Before starting the Download and Upload throughput tests, the test set pings nearby servers, then it generally selects the one that has the fastest ping response. However, all the nearby Ookla® servers would be a combination of ISP-owned or sponsored servers, and some other servers that are hosted by independent companies, which may reside outside of the footprint of the ISP providing the service. Testing to a server that is not owned/sponsored by the ISP may not guarantee reliable test results, since the server has not been vetted by the ISP providing the service.
Turning the ISP/Sponsor Match setting ON, instructs the test set to prioritize the server search for servers that are sponsored by the ISP and select one of these servers for testing. If no ISP-sponsored servers are found, then the test set would carry out its normal search for the fastest ping-response server.
9. Other Test Features
PoE Check: Verifies the presence of Power over Ethernet on the Link or Device Under Test (DUT).
IP PCAP: Traffic Packet Capture & Decode (function). Enable this advanced troubleshooting feature to capture Layer 3 packets while running tests. Tap on the red IP PCAP button to stop the capture and a standard PCAP file will be saved in the File Manager, where they can be opened (View) and decoded with the built-in Wireshark protocol analyzer or exported to USB for further analysis on a PC.
Tra. PCAP: Traffic Packet Capture & Decode (test application). Launches a separate test application for advanced Ethernet packet capture. PCAP files are stored in the File Manager, where they can be opened (View) and decoded with the built-in Wireshark protocol analyzer or exported to USB for further analysis on a PC.
Cable: The Cable Check function provides basic diagnostics for the UTP cable pairs' pin-out (straight, crossed, low impedance mismatch, short, high impedance mismatch, open) and as well as their length.
Update: When V-TEST is configured to the manual VeEX Managed mode, this button is used to update the servers' list. Internet access is required to receive the server lists maintained by VeEX.
V-PERF: TCP/UDP-based business Internet speed performance test based on RFC6349 and compatible with RTU-300 hardware-based centralized test heads as well as iPerf and iPerf3 servers. A common source of customer complaints come from file transfer speeds not matching the throughput rates guaranteed in the SLA. While many factors affect TCP applications performance, including customer’s operating system hardware performance and settings (TCP window size), carriers need to prove SLA with a test tool that can show TCP performance independent of Operating System or Server limitations and present repeatable reliable results. The test set V-PERF feature uses RFC6349 test methodology and metrics for qualifying network TCP or UDP performance. It offers a full line rate stateful TCP test with configurable window
sizes, client and server modes as well as compatibility with iPerf servers.
V-FTP: Internet speed performance test based on uploading and downloading large test files to an FTP server. The V-FTP Throughput feature allows users to test up to full line rate FTP protocol performance to any FTP Server by uploading and downloading files.
10. Related Topics
10.1 What Does Layer4+ Refer To?
Layer4+ refers to the Internet layers 4 and above (transport and application layers), which are more closely related to the customers/subscribers’ applications and the way they use Ethernet, the Internet, and how they perceive performance (quality). In terms of test features, it refers to the respective QoS and QoE measurements, such as V-TEST (speed test), V-PERF (RFC6349/iPerf) and V-FTP.
More details in this link.
10.2 How Does Speedtest.net Work?
Please follow this Ookla link for more details.
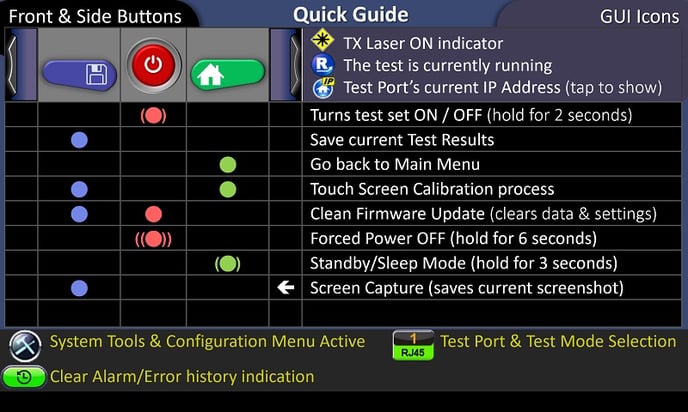
10.3 Quick Guide
During the boot-up sequence, the test set displays the following quick reference list of basic features and functions.
Note: Firmware updates clear all user data stored in the test set. Before performing a firmware update, it is recommended to go to >System Tools >Results & Files >Saved, select all the files, and tap on the ![]() To USB button to perform a backup. After the software update, use the
To USB button to perform a backup. After the software update, use the ![]() From USB button to restore all the relevant files from the USB memory stick.
From USB button to restore all the relevant files from the USB memory stick.
10.4 How to Change the Time and Date
Go to this link for details.
10.5 NoApp QR Code Results Transfer
For more details refer to How to Use QR Codes and NoApp Service to Transfer Test Result Data, Generate, Upload and Share Test Reports article.