
The FL41 is a budget friendly and palm-sized Fiber Length Check and Optical Power Meter for measuring end-of-fiber on fiber drops and links with spans from 10 m to 20 km in length. The FL41f variant has a built-in filter for in-service testing. The FL41 is the perfect validation and troubleshooting tool for service activation technicians who need to measure and confirm fiber links and drop fibers for PON, R-PHY/DAA, 5G FTTA, FTTx, LAN/WAN, CATV, and utilities applications, to make sure there are no faults or breaks in the span. For example, if an optical modem or ONT at the customer premises is not linking up, user can check the signal level using the FL41's OPM. If the value is lower than expected, the FL41 can measure the length of drop (or last fiber segment) to make sure it matches the records. That is, there are no breaks or faults on that section.
The FL41 may also be referred as: Fault locator, fiber length verification/validation tool, fiber link validation tool, or fiber length check.
For more details and resources, visit: https://www.veexinc.com/products/fl41
1. The FL41 Fiber Length Validation Tool at a Glance

2. Basic Operation
2.1 Operating Modes
- Fault Locate – Report the measured length of the connected fiber
- Power Meter – Measure the power of the connected fiber
- FL/OPM Results – View saved test results and generate QR codes to transfer to NoApp™
2.2 General Controls
The following keypad actions apply across all modes unless noted:
- Shift – Hold while pressing another key for green alt. options or hold for 3 seconds by itself to open Settings
- Shift + Left Arrow – Turn off backlight (except OPM mode)
- Shift + Right Arrow – Turn on backlight (except OPM mode)
- Mode – Switch between modes in the order shown:

3. Fiber Length (FL) Measurement
3.1 Controls
- Start – Run a test and display the result
-
When finished viewing a result, press Start to run another test or Left Arrow to hide the result
-
- Left/Right Arrows – Change measurement units
- Save (Shift+Start) – Save current results and display QR code for NoApp™ result transfer
- Press any button to exit QR code
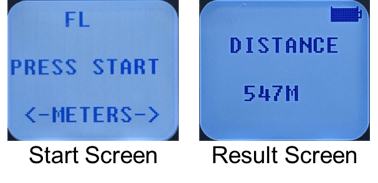
3.2 Testing Process
Press Start to run the end of fiber detection test. The FL41 steps through the screens below then displays the distance result.

3.3 Measuring with a Launch Reel
It’s often helpful to test with a launch reel, such as when measuring fibers shorter than the FL41’s minimum range of 10 meters. The FL41 allows users to configure a launch reel length that is automatically subtracted from the measured results.
To set up a launch reel, hold Shift to enter Settings, then press Mode once to enter the Launch Reel Length Menu. The menu includes several preset values, as well as Measure and Custom.
- Measure – immediately measure the attached launch reel and store the value in the Custom option
-
Custom – subtract the stored launch reel value from future test results
Select the preset value 0 to test without a launch reel.
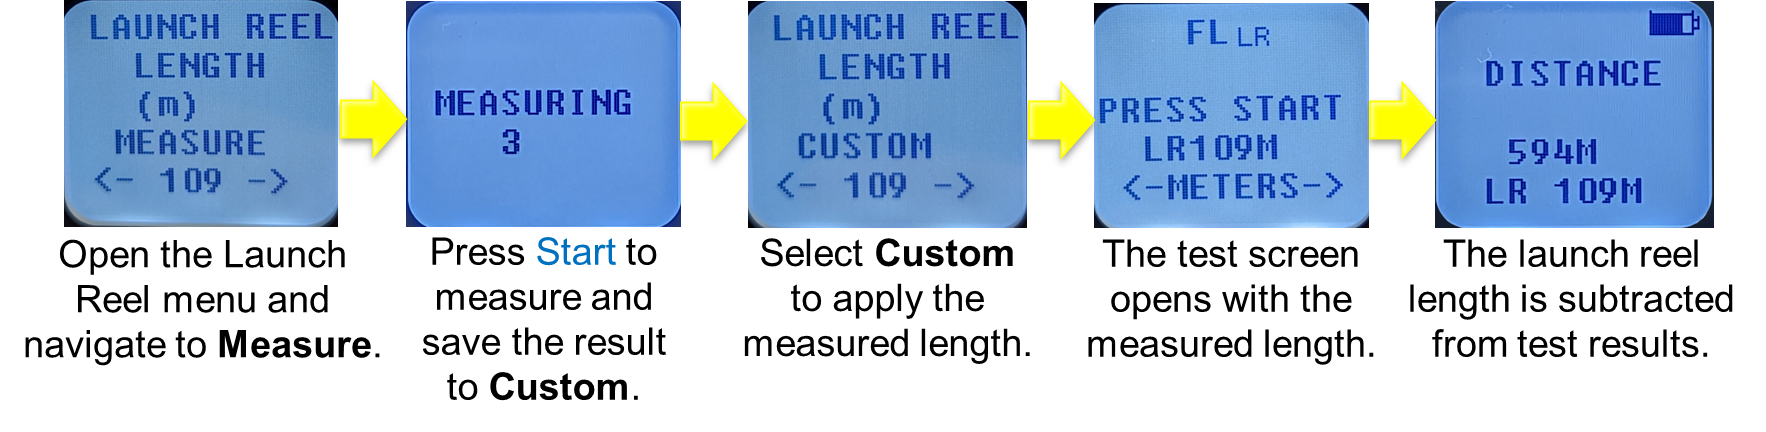
The process to set up and test with a launch reel is shown below.
3.3.1 Using Preset Lengths

3.3.2 Using a Custom Length
Before beginning, connect the fiber reel to the FL41 with no other fiber.
 The Custom setting can be used for multiple tests without needing to remeasure.
3.4 Detecting an ONT at the Fiber End

4. Optical Power Meter (OPM)
4.1 Controls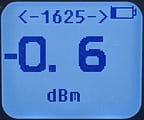
- Left/Right Arrows – Select wavelength
- Zero (Shift+Left Arrow) – Calibrate dark current
- Calibrate before testing to ensure accuracy in different temperatures/environments
- Any fiber must be removed and dust cap must be closed
- Ref (Shift+Mode) – Set reference power for loss (dB) testing
- dB/dBm (Shift+Right Arrow) – Toggle dB/dBm
- Save (Shift+Start) – Save current result and display QR code for NoApp™ result transfer
- Press any button to exit QR code
5. Viewing Saved Results
5.1 Controls
- Left/Right arrows - Select result
- Start - View result
- Selected result data is displayed, then the NoApp™ QR code
- Press any button to exit QR code
6. NoApp™ QR Results Transfer & R-Server

VeEX's patent pending simple NoApp™ cloud service offers a quick and simple way to transfer measurement results, generate, upload & share Test Reports. Just scan the QR code on the screen.
-
The secure NoApp™ Cloud service offers test results transfer to smartphones, tablets or PC/MAC, without any setup, pairing, connection or software (app) to install. No software updates required - this web application is always up to date.
-
Augments test results with GPS coordinates, job information, comments, pictures, etc.
-
Compatible with VeSion® R-Server (R-Server account required).
6.1 Using NoApp™ QR Code Results Transfer & Report Generation
Use a smartphone or tablet camera/QR code scanner to scan s result WR code and manage the result in the NoApp™ cloud service. Press any button to return to exit the QR code.

Scan the sample QR code above to see an example.
Visit the NoApp Cloud Service link, to learn more about this free service that easily allows Test Reports creation by annotating, customizing, uploading and/or sharing the test results.
7. Power Supply
The FL41 comes from the factory equipped with a standard micro-B USB charging port (located at the bottom), USB cable and USB charger (AC/DC wall adapter). Alternatively, in case of emergency, the tester can be temporarily run with regular non-rechargeable AA alkaline batteries. For more details refer to https://kb.veexinc.com/en/knowledge/can-regular-aaa-alkaline-batteries-be-used-with-fx/fl/cx4x-meters.